brown sugar walnut tang yuan in persimmon ginger soup

hotteok tang yuan

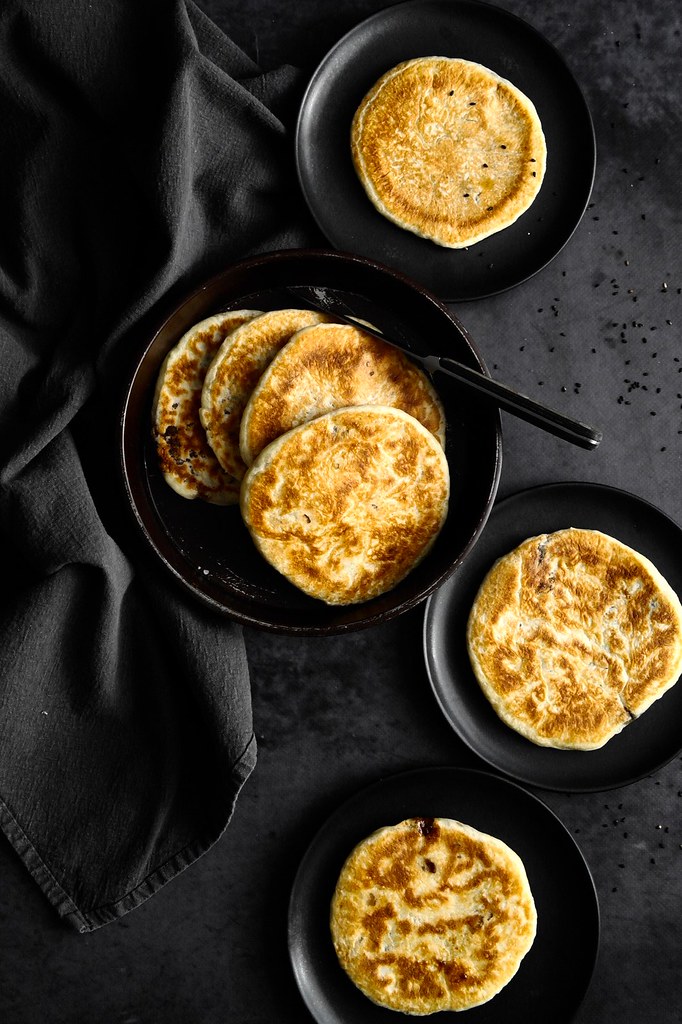
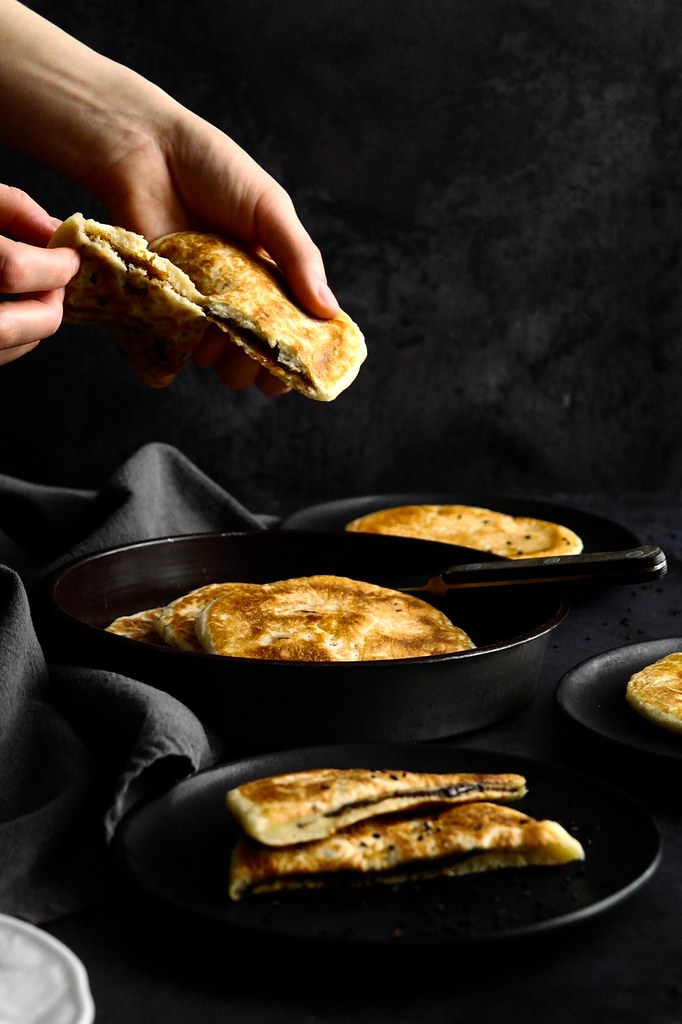
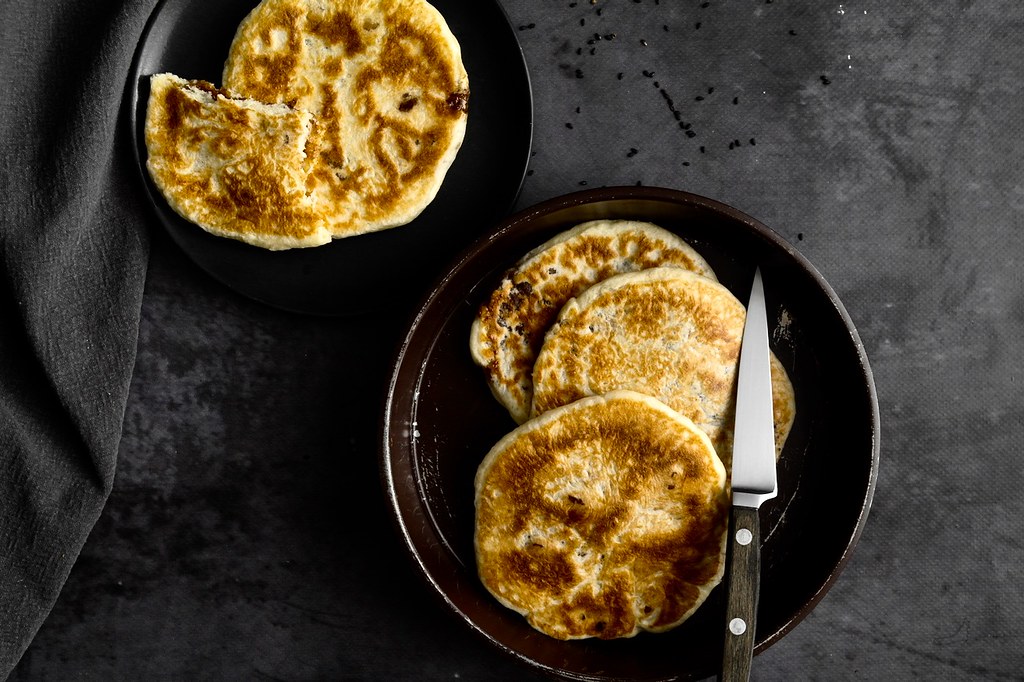
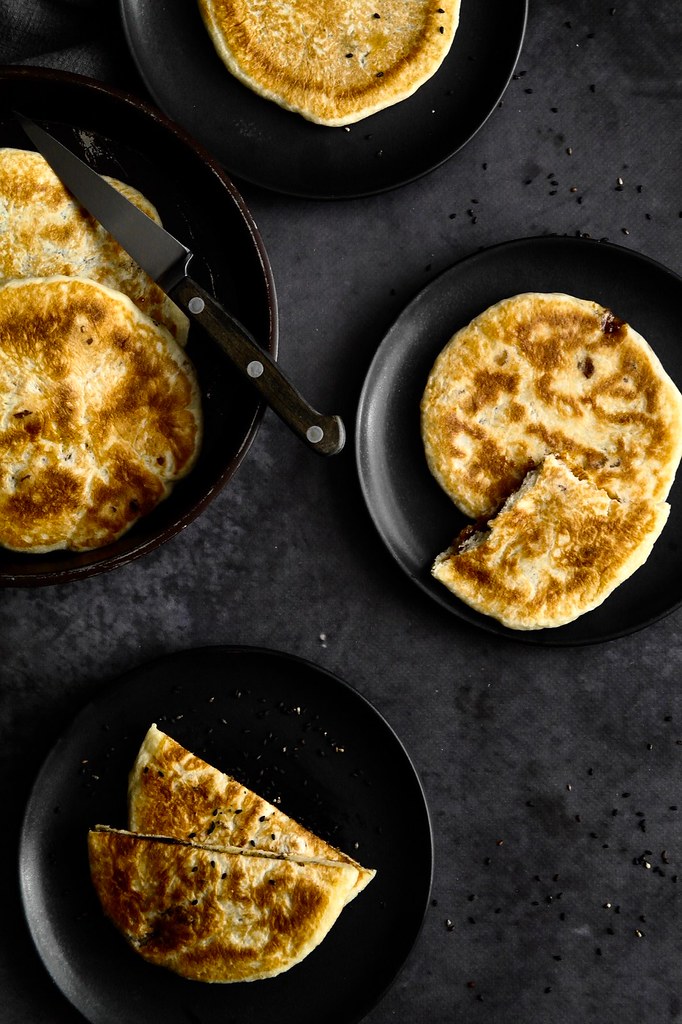
I once made some black sesame-filled hotteok, the filling reminding me of black sesame tang yuan. Getting a bit topsy-turvy, here is the inverse: a tang yuan with a brown sugar, walnut and cinnamon filling inspired by hotteok!

hotteok tang yuan
hotteok tang yuan
hotteok tang yuan
hotteok tang yuan

To go with it: a soup inspired by sujeonggwa, a Korean punch made with cinnamon, ginger and usually red dates and dried persimmons. As I already had cinnamon in the filling, I focused on the ginger, persimmon and red dates. Also rather untraditional, instead of serving it cold, I kept the soup warm – a warm liquid is best for serving tang yuan in as it keeps the rice flour dough soft. Overall, I found it to be a cozy, wintery take on tang yuan and wonderfully warming!

This dessert does draw on a mix of inspiration so I want to be sure to link to some recipes which I used for reference to acknowledge – and besides, perhaps it’s just one particular aspect of this dessert which strikes your interest! Tang yuan (Woks of Life) (and of course, many other cultures have similar and different sweet rice cakes – songpyeon for instance, is a Korean filled moon-shaped rice cake), hotteok (Korean Bapsang) and sujeonggwa (My Korean Kitchen) were the main sources of inspiration.

Happy winter!

hotteok tang yuan

brown sugar walnut tang yuan with persimmon ginger soup

  • Servings: 12 tang yuan
  • Print

Tang yuan adapted from Woks of Life and Fuscia Dunlop’s Every Grain of Rice. Hotteok inspiration from Korean Bapsang and sujeonggwa inspiration from My Korean Kitchen.

persimmon ginger broth

  • 1 3/4 cups water
  • a few slices fresh ginger
  • 4 dried red dates
  • 2 dried persimmons, cut into wedges or chunks
  • 1 tbsp granulated sugar

hotteok tang yuan filling

  • 15g all-purpose flour
  • 30g brown sugar
  • 30g butter, lard or coconut oil, melted
  • `1/8 tsp ground cinnamon
  • pinch salt
  • 1 generous tbsp chopped toasted walnuts

tang yuan dough

  • 100g glutinous rice flour
  • 75-95g lukewarm water
  • 1/2 tsp oil

For the broth, combine all the ingredients in a small saucepan. Bring to a boil and simmer for 5 minutes, then cover and set aside to steep while you make the tang yuan.

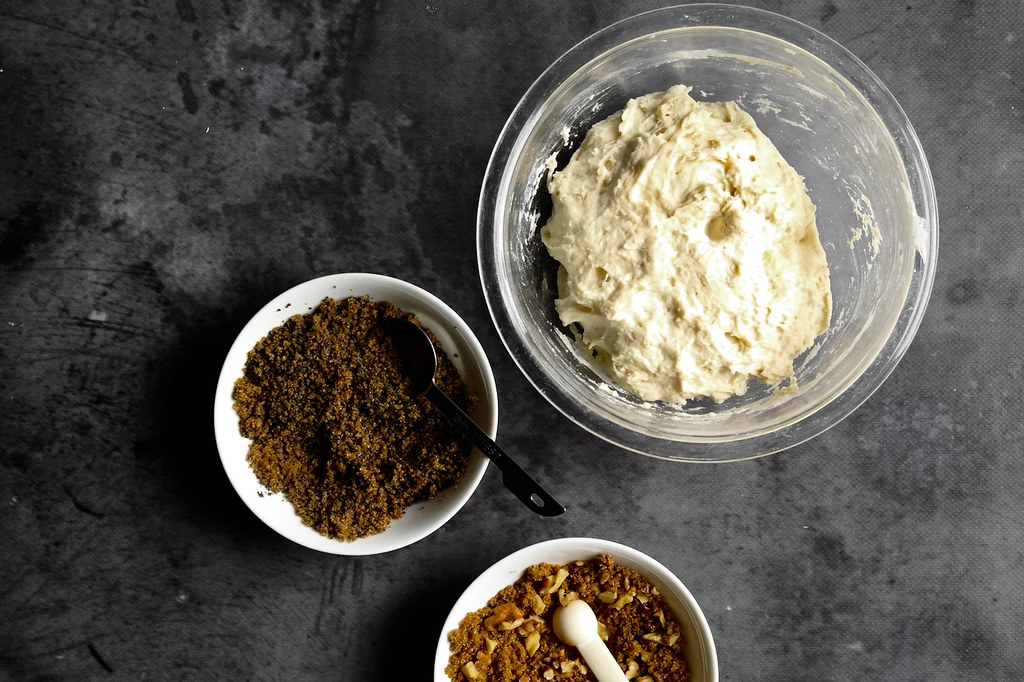
For the filling, place the flour in a small dry pan over medium heat. Cook, stirring constantly, until the flour smells a bit toasted and cooked, around 5 minutes. Remove from the heat and transfer to a small bowl. Add the brown sugar, melted butter/lard/coconut oil, cinnamon, salt and chopped walnuts. Stir together, then place in the fridge to firm up.

Once firmed, divide the filling into 12 portions (about 6g each) and roll each into a little ball. Return to the fridge to keep firm until ready to assemble. (Initially I did roll mine in more rice flour as seen in the photographs, but I found it easier to assemble the tang yuan without doing that.)

For the dough, stir together the rice flour, water and oil. Begin with 75g of water and add more as needed to form a soft dough with a putty-like consistency. Divide the dough into 12 portions (about 16-17g apiece) and roll each into a ball.

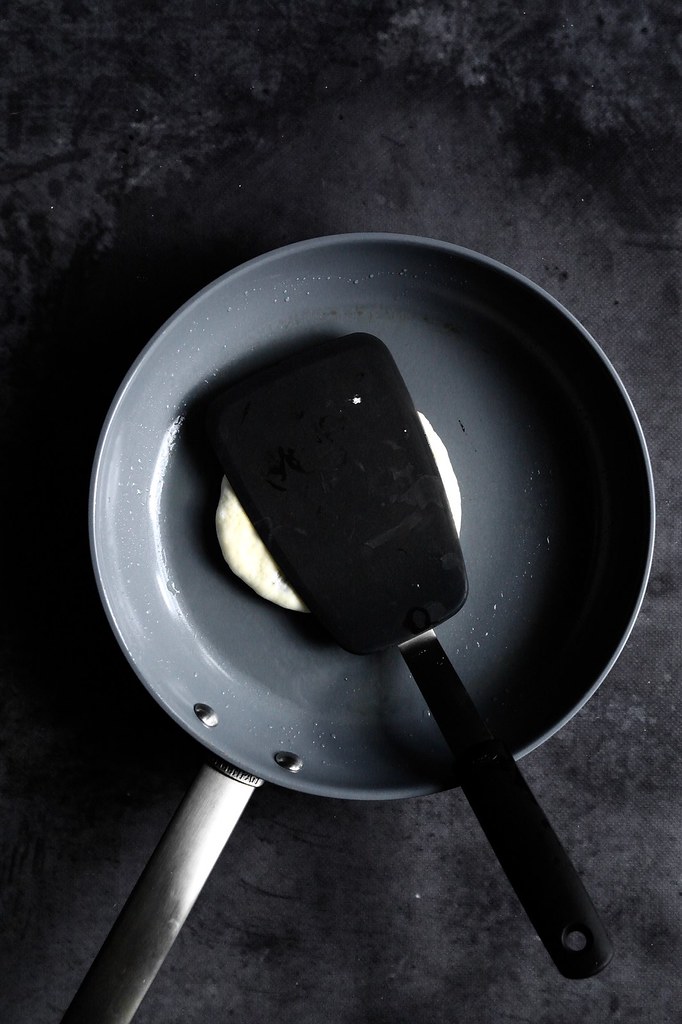
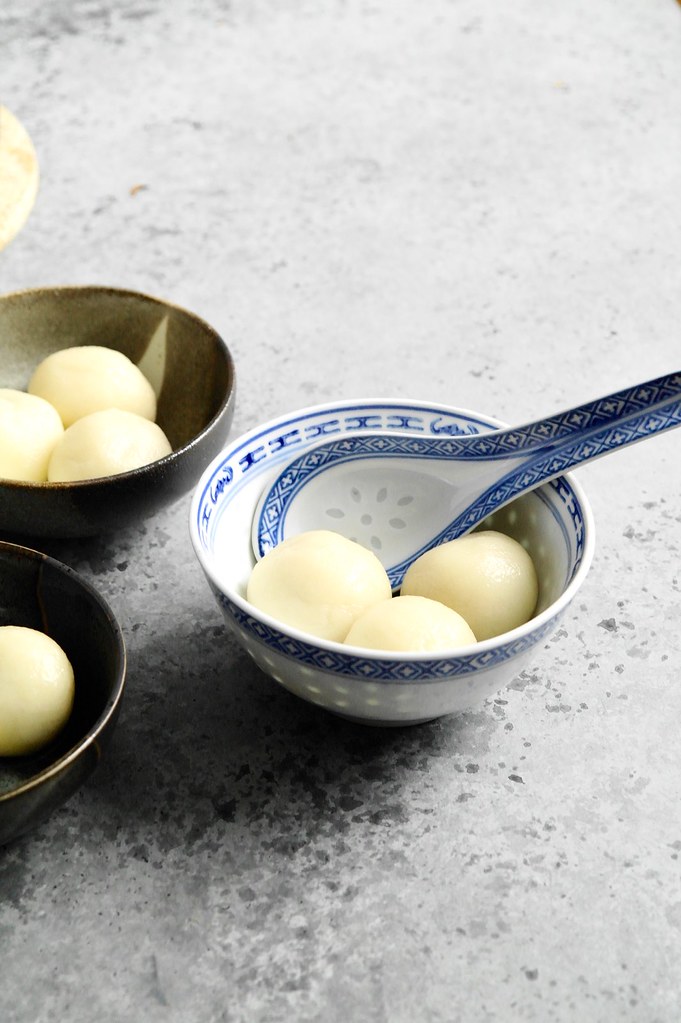
To assemble, take the filling from the fridge. Poke your thumb into a ball of dough to create a cup like shape and fill with a portion of filling. Push the surrounding bits of dough up to completely cover the filling and roll between your palms into a smooth sphere. If the dough starts to crack a bit, moisten your palms with a dab of water. Repeat with the remaining portions until all the tang yuan are filled.

Fill a medium saucepan with water and bring to a boil. Drop in the tang yuan, bring back to a boil and then set to a simmer. Cook for about 10 minutes or until the tang yuan are soft and the filling is melted. Meanwhile, reheat the persimmon ginger soup.

To serve, scoop 2-3 tang yuan into a bowl and cover with a ladleful or two of the warm soup.

hotteok tang yuan

houjicha, kinako & peach tiramisù

houjicha kinako peach tiramisu

Maybe I have developed a bit of a tiramisù obsession. I love the flavours of coffee and marsala, but also the format of a well saturated cake component with plenty of thick cream – and it lends itself well to other flavour profiles too. Which means I can make even more tiramisù!

And I think this one is particularly lovely – it has both the toasty flavours of houjicha (roasted green tea) and kinako (roasted soybean powder), layered with fresh peaches and a mascarpone cream.

houjicha kinako peach tiramisu

I put this together much like one would a regular tiramisù. Begin with a layer of ladyfingers soaked in houjicha – I think it’s a great substitute as it has the body of coffee, but with a gentler tea flavour. After that, scatter a layer of diced peaches and cover it all with a marscarpone-based cream. Finish with kinako, which is often served heavily dusted over different varieties of wagashi, generously sprinkled overtop.

I made mine in a 23x32cm (~9×12″) oval saute pan (area of about 577cm2) ; alternatively, you could make this in a 9×9″ square pan (area of about 480cm2 so layers will be a bit thicker). If you have a deeper dish for a double layered tiramisù, you may need to double the recipe.

houjicha kinako peach tiramisu

houjicha, kinako & peach tiramisù

  • Servings: 23x32cm oval pan
  • Print

Mascarpone cream adapted from Sally’s Baking Addiction, with technique for cooking the eggs borrowed from Stella Park’s semifreddo.

mascarpone cream

  • 2 large eggs
  • 35g sugar
  • 200g mascarpone
  • 2 tbsp marsala
  • 200g heavy cream, whipped

houjicha soak

  • 60mL hot water
  • 1 tbsp houjicha powder

assembly

  • 2 peaches, peeled and chopped into 1-1.5cm cubes (200g chopped peaches)
  • ~2 dozen homemade ladyfingers (see recipe below; you’ll need fewer if storebought larger ones)
  • kinako

special equipment

  • 23x32cm (~9×12″) oval pan – the closest standard pan is probably a 9×9″ square tin, or use whatever you have and spread the components thicker or thinner

for the mascarpone cream, whisk together the eggs and sugar in a glass bowl. Set over a saucepan of simmering water and stir constantly with a rubber spatula, heating the eggs until they reach 165F. They’ll appear syrupy and quite warm to the touch.

Transfer the eggs to the bowl of a standmixer and whip until they become pale, opaque, more voluminous and cool, about 10-15 minutes on medium-high to high speed. The eggs should be thick enough to mound up when dropped from the whisk. (As it’s a smaller volume, it’s a bit tricky to really whip them up with the standmixer – they’ll likely only be doubled in volume instead of quadripled.)

Cream the mascarpone and marsala together in a large bowl. Fold in the whipped cream, then fold in the eggs. 

for the houjicha soak, whisk together the hot water and houjicha powder.

to assemble, have a 23x32cm (~9×12″) oval pan at hand. Dip both sides of the ladyfingers in the houjicha soak and use to cover the bottom of the pan. Break the cookies into pieces as needed to fill in all the gaps. Scatter the chopped peaches evenly over the cookies, then dollop the mascarpone overtop. Spread into an even layer with an offset spatula. Place in the fridge for at least couple hours or overnight. Just before serving, dust the top generously with kinako.

savoiardi (ladyfingers) 

Makes about 3 dozen 9cm savoiardi. Adapted from As Easy as Apple Pie, with some adjustments to the method. 

  • 43g all-purpose flour
  • 20g potato starch or corn starch
  • 2 eggs, separated
  • 50g sugar, divided
  • Pinch salt
  • pinch cream of tartar
  • 7g milk

Preheat the oven to 350F. Line a 3/4 baking sheet with parchment paper (or use two regular half baking sheets).

Whisk together the flour and cornstarch in a small bowl. 

Place the egg whites in the bowl of a standmixer along with half of the sugar (25g), salt and cream of tartar. Whip until stiff peaks are just formed (if anything, aim a little under – very firm, approach stiff). 

While the egg whites whip, in a large bowl whisk the egg yolks and remaining 25g sugar with a handwhisk until very light, fluffy and doubled or tripled in volume. Whisk the milk into the egg yolks.

Whisk a dollop of the egg whites into the egg yolks to lighten, the fold in the remaining egg whites with a rubber spatula. Sift the flour mixture over top. Fold in gently until just combined.

Fill a piping bag fitted with a 1.2cm round tip (I used Wilton 2A – you can also pipe them bigger if you prefer!) and pipe strips of batter about 9cm long on the prepared trays. 

Bake for about 10-15 minutes or until lightly browned. Let cool, then store in an airtight container.

rhubarb & ginger eton mess (…or what to do with failed pavlova)

rhubarb ginger eton mess

My biggest piece of advice for low sugar baking is: temper your expectations. Decide what tradeoffs you don’t mind! Roll with the punches! Because in some cases, sugar is pretty important… such as in the case of pavlova. I’ve been trying to inch my way down with the sugar (usually I do 1:1, here I tried a cautious 0.67:1), and more recently wanted to give it a try in individual form.

Low sugar pavlova, as it turns out, does not crisp so well. Hence while you’re in the business of trying to achieve a thin, crisp outer layer, mini pavs can become dry all the way through – cooked to styrofoam stage instead of marshmallow.

Another issue with low sugar pavlova is that it develops a bit of a gumminess. It is semi-remedied if you cook it all the way through to the styrofoam stage… and the softening effect of plenty of cream and fruit juices will help re-soften it again too.

Continue reading “rhubarb & ginger eton mess (…or what to do with failed pavlova)”

black forest clafoutis

black forest clafoutis

I love black forest takes on dessert and here is yet another! Clafoutis is dreadfully simple and this version is no exception – throw all the ingredients in a blender, then into a pan. A quick bake and you have a chocolatey set custard dotted with cherries. Serving with whipped cream is a must.

black forest clafoutis

For pretentious drama I baked this one in my dad’s old saute pan, but this can certainly be baked in another type of baking dish – a greased 8″ square or 9″ round cake tin, for instance, or a glass or ceramic baking dish. Depending on the size the clafoutis may end up a bit thicker.

black forest clafoutis

black forest clafoutis

Makes a generous clafoutis in a 23x32cm (~9×12″) oval saute pan. Alternatively, you can make a bit of a thicker clafoutis in an 8″ square or 9″ round dish.

  • 375g cherries, pitted
  • 3 tbsp kirsch
  • 45g all-purpose flour
  • ¼ tsp kosher salt
  • 40g granulated sugar 
  • 3 large eggs
  • 18g cocoa powder
  • 45mL boiling water
  • 225g half-and-half cream
  • 45g dark chocolate (70% cocoa), melted

Preheat the oven to 375F. Lightly butter the pan.

Stir together the pitted cherries and kirsch in a large bowl and set aside while you prepare the batter.

Place the remaining ingredients into a blender. Blend until smooth. Pour the batter into the bowl containing the cherries and kirsch and stir together.

Pour into the prepared pan and evenly spread out the cherries. Bake for about 20-30 minutes or until the clafoutis is set.

Serve warm with plenty of whipped cream.

chocolate genmaicha purin

chocolate genmaicha purin

The way I wrote recipes pre-blog went something like this: a list of ingredients + maybe a baking temperature +/- possibly a baking time. Either on a sticky note (destined to be accidentally thrown out) or in an obscure word document that I would never find again.

It took some searching, but I did find one word document again while I looking for a genmaicha-infused chocolate caramel custard I had made back in high school. It was written, of course, in typical fashion: a list of ingredients (no baking temperature, no baking time). To be fair to my former self, since I was making quite a few puddings at the time, I likely had the procedure memorized.

chocolate genmaicha purin

I felt fairly confident I could do it again, by intrinsic instinct, maybe, or perhaps some muscle memory honed from teenagehood would take over. But… I overbaked my first batch… and then my second… On my third batch I figured that I should consult some another recipe apart from my very bare-bones list. With the guidance of Japanese Cooking 101 blog, I modified my ratios of egg and milk, baking temperature, and time. A few batches and blunders later, I ended up with these: a toasty, slightly bitter, chocolatey custard which maintains a delightful jiggle when turned out on the plate.

Baked or steamed custards with caramel have many forms and names and varying, albeit linked, origins: South American flan, Filipino leche flan, French crème caramel, Japanese purin. Though you can likely tell that the shape here takes most inspiration from Japanese style purin, so I’ve proceeded with that for the recipe title.

I’ve found chocolate can easily overwhelm other flavours, but a long infusion with plenty of genmaicha, a blend of roasted rice and green tea leaves, ensures it comes through well – a roasted, grainy, pop-corn sort of flavour, along with bitter green tea. This also departs from classic purin in a couple more ways. The cream and chocolate give it some additional richness. I’ve also never quite gotten the sides of the purin to be all that smooth, something which perhaps has to do with the chocolate content. The interior on the other hand, is thickly soft, lush and most definitely smooth – and that’s the part that matters most to me!

I’ve also more recently revisited this recipe to add a no-bake gelatin-set version! It has all the richness of the original, but with an extra jiggle and guaranteed smoothness (no need to worry about baking time!). However, the addition of gelatin does make it less suitable for different dietary needs, so both are options are described below!

chocolate genmaicha purin
Baked purin…
chocolate genmaicha purin
…or no-bake purin?

chocolate genmaicha purin (baked version)

You can make 4 servings in 120mL ramekins or 3 servings in 150mL molds. Here I’m using metal pudding cups/dariole molds which have a smaller bottom surface area – so only 40g of sugar is needed for the caramel. If you use four 120mL glass ramekins, use 60g of sugar.

I first made a rendition of this recipe about eight years ago, based this on a breakfast pudding from Mollie Katzen’s Sunlight Cafe, though they no longer have much resemblance to the original after I added caramel, chocolate and cream. The ratio of egg to milk is based on Japanese Cooking 101 blog.

genmaicha infused milk

  • 300g whole milk
  • 16g (1/4 cup) genmaicha  

caramel

  • 40-60g granulated sugar (40 if using 3x150mL molds with narrow bottoms, 60 if using 4x120mL ramekins)

purin

  • 50g 70% dark chocolate, finely chopped 
  • 70g heavy cream
  • 240g genmaicha infused milk
  • 2 large eggs
  • 1 tsp granulated sugar
  • good pinch salt

genmaicha milk

Stir together the milk and genmaicha in a container. Cover and let infuse in the fridge for about 24 hours. The next day strain the milk, pressing to extract as much milk from the tea as you can. Measure the amount you get – you may need to top it up a little bit with additional milk to get 240g.

caramel

Have three 150mL pudding cups (or four 120mL) ready.

Place the granulated sugar and 2-3 tbsp of water in a small saucepan. Heat until boiling and the sugar dissolves. Continue to boil, swirling the pan every so often, until the sugar is caramelized to your liking. 

Distribute the caramel amongst the pudding cups and, if needed, swirl to cover the bottoms. Let cool and set.

purin

Preheat the oven to 300F. Set the pudding cups in a tall pan. Have some water on the boil for a water bath.

Place the chocolate in a heatproof bowl. Heat the cream until it boils, then pour over the chocolate. Allow to sit for a few minutes to allow the chocolate to melt, then whisk until smooth. 

Heat the genmaicha-infused milk until it just comes to a simmer, and then remove from the heat. Whisk into the cream and chocolate mixture. 

Whisk together the eggs in a bowl with the sugar and salt, then add to the hot milk mixture and whisk until smooth. Pass the mixture through a sieve into a measuring cup with a pouring spout. Evenly distribute into the pudding cups.

Fill the pan with just boiled water halfway up the sides of the pudding cups. Cover the pan with tinfoil. Bake until the edges are set while the middle still wobbles, about 30-55 minutes. This is a wide time range because there are quite a few factors which can affect this – the size of the pudding, material of cup, as well as the temperature of the pudding mixture and the water bath. If your pudding mixture is quite hot, they’re smaller, and you’re using metal cups check earlier. It has taken me around 35 minutes when the pudding mixture was quite hot going into the oven, but nearly an hour when the pudding mixture had cooled to more lukewarm.

Once cooked, remove the water bath and let cool, then refrigerate. In order for the caramel to dissolve into a sauce, the puddings need to rest in the fridge for at least one overnight (as moisture gradually diffuses from the pudding).

chocolate genmaicha purin (no-bake version)

You can make 4 servings in 120mL ramekins or 3 servings in 150mL molds. This is a modification of the above recipe with reference to Just One Cookbook’s no bake purin. A couple differences – the gelatin-set pudding holds onto its moisture quite a bit more, so the caramel sauce needs a bit of water added to it before layering into the bottom of the cups.

genmaicha infused milk

  • 300g whole milk
  • 16g (1/4 cup) genmaicha  

caramel

  • 50g granulated sugar
  • 2 tsp boiling water

purin

  • 1 1/2 tsp powdered gelatin
  • 1 tbsp cold water
  • 2 egg yolks
  • 1 tsp granulated sugar
  • pinch salt
  • 240g genmaicha infused milk
  • 50g 70% dark chocolate, finely chopped 
  • 70g heavy cream

genmaicha milk

Stir together the milk and genmaicha in a container. Cover and let infuse in the fridge for about 24 hours. The next day strain the milk, pressing to extract as much milk from the tea as you can. Measure the amount you get – you may need to top it up a little bit with additional milk to get 240g.

caramel

Have three 150mL pudding cups (or four 120mL) ready. As well, have a dishcloth wet with cold water on hand, along with some boiling water.

Place the granulated sugar and 2-3 tbsp of water in a small saucepan. Heat until boiling and the sugar dissolves. Continue to boil, swirling the pan every so often, until the sugar is caramelized to your liking. 

Immediately transfer the saucepan from the burner to the damp dishcloth. Cautiously add the 1 tbsp boiling water (retract your hand as soon as you’ve added it as it will spit violently). Stir until smooth to form a caramel sauce.

Distribute the caramel amongst the pudding cups and swirl if needed to cover the bottoms. Let cool.

purin

In a small bowl, stir together the gelatin and 1 tbsp water. Set aside to bloom.

Whisk together the egg yolks and sugar in a heatproof bowl. Place the genmaicha-infused milk in a small saucepan and heat until steaming and hot. Slowly pour the milk into the egg yolks while whisking constantly to temper. Transfer the mixture back to the saucepan.

Cook over medium while scraping the pan constantly with a rubber spatula. Continue to cook until the custard is slightly thickened or has reached about 160F in temperature. Immediately remove from the heat and add the bloomed gelatin, stirring it in until it melts.

Place the chocolate in a heatproof bowl. Heat the cream until it boils, then pour over the chocolate. Allow to sit for a few minutes to allow the chocolate to melt, then whisk until smooth. Slowly whisk in the genmaicha custard (it should still be quite warm to avoid shocking the chocolate).

Pass the mixture through a sieve into a measuring cup with a pouring spout – if it is still quite hot, let cool until lukewarm. Evenly distribute into the pudding cups. Chill overnight in the fridge.

To serve, put some hot water in a tall bowl or cup. Briefly submerge the outside of a purin in hot water, then place a plate on top. Invert and give it a shake or two until you feel the purin has dropped onto the plate. Remove the cup.

Note: if you’re using metal cups, only submerge in hot water for a few seconds – too long and melted purin will be mixed into the caramel sauce.

chocolate genmaicha purin

strawberry milk with matcha panna cotta

strawberry milk latte with matcha panna cotta thumbnail

Last fall my roommate and I spent an hour in line at the new Machi Machi, a Taiwanese tea shop chain, that had opened up in Toronto – the wait an obvious necessity, my roommate pointed out, as after all, Jay Chou is a fan. We also discovered that Machi Machi drinks make for perfect colour-coded fashion accessories and there is a super cute wall to take photos with (note: none of these infants, dogs or fashionistas are me).

Long wait aside, we both agreed that the fresh strawberry latte with panna cotta (also a fashion necessity) was our favourite – strawberries pureed with milk, poured over a soft and jiggly panna cotta, and the whole thing drank with a straw. (It must be said: eating panna cotta with a straw is pure brilliance.)

Continue reading “strawberry milk with matcha panna cotta”

houjicha & persimmon dorayaki

persimmon houjicha dorayaki

This is day 9 of a series celebrating local Toronto businesses!  Recent events have put many local businesses in a difficult position and unfortunately, it’s not clear when this situation will come to an end. For ten days I’ll be posting recipes inspired by some of my favourite local businesses as my own way of celebrating what they bring to our communities. While we may not be able to visit our local bakeries, cafes and restaurants right now, this is a way of keeping them in mind, and a reminder to support them again once there is a chance.

Ninetails Coffee Bar is a newer addition to the Bloor Koreatown strip serving coffee, matcha and Japanese sweets to a cheery backdrop of pop-y Beatle’s covers and doo-wop. Their freshly made dorayaki are generously-sized and sandwich one of three fillings – anko, custard, and matcha custard. My previous dorayaki experiences have all emerged from imported plastic packaging, where I had assumed the perfectly shaped pancakes were due to the magic of food manufacturing technology. However, the pancakes at Ninetails are actual embodiments of perfection as well: circular, evenly deep brown, and branded with a small nine-tailed fox. They’re firm, honeyed, surprisingly tender, and sport a bouncy chew unlike an American style pancake. Against that backdrop, I am most partial to the thick soft swirl of custard cream as a filling. (On the savoury side, they also happen to have an avocado toast of miracles – thick-cut crusty bread piled with an eqi-thickness of avocado, toasted sesame oil, furikake and shichimi togarashi.)

persimmon houjicha dorayaki

Fresh dorayaki has been a revelation, as has been the creativity of their fillings beyond anko. It gave me some inspirational leeway to brainstorm other dorayaki filling flavours. I filled these ones with houjicha whipped cream and a big slice of persimmon. It’s a mellow, comforting combination.

The initial version of this recipe had a houjicha pastry cream, but I’ve found that houjicha tends to make the pastry cream looser and less stable for filling doyakaki. The whipped cream, with a bit of mascarpone for body, is more reliable – and quick and easy too! I used to use a persimmon compote, but for the most efficient distribution of persimmon, I’ve actually used a round cross-sectional slice of persimmon instead which fills up the pancake perfectly.

persimmon houjicha dorayaki

houjicha & persimmon dorayaki

  • Servings: 5 dorayaki
  • Print

Pancake recipe from Cooking with Dog. Makes ten 3 1/2″ pancakes, for 5 dorayaki.

pancake

  • 2 eggs
  • 60g sugar
  • 1 tbsp honey
  • 1/2 tsp baking soda
  • 50mL water
  • 120g cake flour
  • 1-2 tbsp of water

houjicha cream

  • 100g whipping cream
  • 50g mascarpone
  • 1 tsp houjicha
  • 1 1/2 tsp granulated sugar, or to taste

assembly

  • 1 fuyu persimmon (or 2, depending on how many slices you get out of one)

For the pancakes, whisk eggs with sugar and honey, and beat for 3 min (i.e. listen to one song while you do this) until light and thick. Dissolve the baking soda in 50mL water and whisk into the eggs.

Add in the flour and whisk until smooth and combined. Cover and let the batter rest in the fridge for 15-30 minutes.

Add 1 tbsp of water at a time to make batter flow fluidly (see the original recipe for a video which gives you a sense of the desired consistency).

Heat a nonstick pan over medium heat (you can start the pan over medium to medium-high to get it heated, and then as you continue to cook pancakes, lower the heat gradually to medium and medium-low). Once heated, pour a bit of oil into the pan and rub in a thin layer over the pan. When making the pancakes, pour the batter from a few inches above the pan in one spot to allow the batter to spread out into a circle on its own. I found it took a small ladleful (about 35g) of batter to make a 3 ½” diameter circles. You can make them larger or smaller, just try to be consistent. Cook the pancake until you can see large bubbles appearing under the surface, then scoot around the edges of the pancake with the spatula to loosen before flipping. Cook for another 30 seconds or so on the second side or until the pancake is springy and the bottom is golden brown.

Set the pancakes on a tray and cover with a damp kitchen towel to soften the surface and keep them from drying out. Repeat until all the batter is used. It will make about 10 pancakes.

For the cream, place all the ingredients in a bowl and beat with a wire whisk until fluffy and holds its shape.

To assemble, cut the bottom end from the persimmon, and then slice the persimmon into 5 round cross-sectional slices. You can either peel the persimmon before or after slicing – if you peel it before, the persimmon is quite slippery, which makes it hard to slice.

Match each pancake with another close in size. Put a dollop of cream on the bottom side of one pancake, top with a slice of persimmon, and then a second pancake. Repeat with the remaining pairs.

Notes on making dorayaki:

  • 1. Making consistently sized dorayaki – I used a small ladle to scoop the batter; you can also use a 1/4 cup scoop filled about 3/4 of the way. To be really consistent (though I did not do this in the batch above, so they are not so consistent!), measure out the same amount of batter into a small bowl and then use that to pour the pancakes. For this recipe, measure out 35g of batter into a small bowl and repeat with each pancake (keep using the same bowl). Add a few grams extra to the first pancake as some batter will remain in the bowl.
  • 2. When to flip the pancakes – In my first couple batches, I found I tended to end up with very thick dorayaki, even with proper batter consistency. I realized that it was because I was waiting too long to flip the pancakes over – I would wait until bubbles had appeared, risen to the surface and popped all over the surface of the pancake. Rather, I found it is best to look for the bubbles to appear under the surface, but not quite reach the surface and pop – then flip the pancakes over for a still fluffy pancake, but with more manageable thickness!
  • 3. Making thin dorayaki – another way to ensure you have thinner dorayaki is to use a thinner batter (which is what I did in the batch photographed). If you add about 4 tbsp of water to the batter (instead of 1-2) so that it is the consistency of thick cream, it ensures you make thinner pancakes, but there are some drawbacks to the texture – not quite as bouncy and tender as usual! As for when to flip: the batter bubbles very easily when it is this thin, so flip the pancakes where bubbles are clearly visible across the pancake. However, I found the texture of these pancakes tougher, so I wouldn’t recommend it.

Update notes: Updated Nov 2021 and again in Nov 2023.

black sesame hotteok

black sesame hotteok

This is day 5 of a series celebrating local Toronto businesses!  Recent events have put many local businesses in a difficult position and unfortunately, it’s not clear when this situation will come to an end. For ten days I’ll be posting recipes inspired by some of my favourite local businesses as my own way of celebrating what they bring to our communities. While we may not be able to visit our local bakeries, cafes and restaurants right now, this is a way of keeping them in mind, and a reminder to support them again once there is a chance.

Hodo Kwaja, a bakery located in one of Toronto’s Koreatowns, is an efficient bustle of activity in the morning. The small nut-brown walnut cakes that the bakery is named after trundle by on a conveyer-belt like waffle iron. Along the way they are methodically filled, either with red bean paste, or my favourite, sweet and milky mashed potato mixed with ground almond or walnut. Bought by the half dozen – or several dozen – they’re scooped from wire baskets into paper bags or boxes.

Next to the hodo kwaja, hotteok, brown sugar filled pancakes are smacked onto an oiled griddle and pressed flat with a large wooden-handled aluminum stamp. Thin, chewy dough surrounds a syrupy centre of molten brown sugar seeping with cinnamon and chopped walnuts.

I first tried the hotteok, years ago when I was just visiting Toronto. “They’re amazing,” my sister promised me. And they were – we shared it as we walked, ripping off pieces of pancake. Think cinnamon sticky bun pressed into a delightfully chewy pancake form – one big enough to hold with both hands and that burns if you bite into it too fast.

black sesame hotteok

I decided to give a try at making hotteok myself. As I tend to do when I make something new, I consulted a variety of recipes – from Allrecipes, Kimchimari, Maangchi and Korean Bapsang. Generally I found that the flour to water ratio was typically 2:1 by volume (the recipes I saw ranged from 2:0.75 to 2:1.25). Some recipes used milk, and some used water – as I was indecisive I used half and half. The proportion of glutinous rice flour varied more, from none to 1/5 to 1/2 of the the total flour, so I used a vague average of 1/4 glutinous rice flour.

I read that while brown sugar, walnut and cinnamon is the classic filling, there’s a growing wealth of creative versions using other sweet or savoury fillings. With that in mind, I tried a black sesame and brown sugar fillling, which produces a tarry toasted caramel and a flavour remniscent of black sesame tang yuan.

These were quite fun to make and very satisfying. I can’t get them nearly as thin, even, and perfectly filled as Hodo Kwaja so I can’t wait to go back. However, that smell of cooking yeast dough and melting brown sugar that fills the kitchen is nearly the same.

black sesame hotteok

chestnut & black sesame hotteok

  • Servings: 8 11cm (4.5 inch) hotteok
  • Print

Based on an amalgamation of Allrecipes, Kimchimari, Maangchi and Korean Bapsang. I made half black sesame and half classic but feel free to double one of the filling recipes and do all one kind.

dough

  • 195g all purpose flour (1 1/2 c + 1 tbsp)
  • 56g glutinous rice flour (1/2 c)
  • 2 tsp instant yeast
  • 2 tsp sugar
  • 3/4 tsp kosher salt
  • 120g cold milk (1/2c)
  • 120g boiling water (1/2c)
  • 1 tbsp oil

classic filling (for 4 hotteok)

  • 1/4 c brown sugar
  • 1/4 tsp ground cinnamon
  • about 2 tbsp finely chopped walnuts

black sesame filling (for 4 hotteok)

  • 1/4 c brown sugar
  • 2 tbsp ground black sesame seeds

To make the dough, stir together the flours, salt, sugar and yeast. Stir together the boiling water and cold milk (this will make for a nice warm mixture) and the oil. Add to the flour mixture and stir with a wooden spoon until a very sticky dough is formed. Cover with a damp towel and set aside to rise for an hour or so, or until doubled.

Make each filling by stirring together the ingredients.

Lightly grease your hand and work surface as you work with the dough. Divide dough into eight pieces. Flatten the dough into a large round in your palm. Top with 1/4 (about 1 1/2 tbsp) filling and pinch the dough to seal around the filling. Place on a tray lined with parchment and repeat until all the pancakes are filled. At the moment they’ll resemble little buns. Cover with a damp kitchen towel to keep from drying out.

Heat a pan over medium, or a bit on the medium-high side. Brush with oil. Place one of the pieces of dough seam side down on the pan. Brush a large flat spatula with oil and use it to press the dough into a flat pancake. Keep the pressure on the pancake for 30 seconds, then remove the spatula.

Let cook until the bottom is golden and the pancake is slightly puffed. Flip over and cook on the other side until golden as well.

The hotteok are best eaten warm – if they’re not fresh from the pan, rewarm them in the microwave to remelt the filling.

Update notes: Updated Feb 2022.

black sesame hotteok

rosemary honey panna cotta with grapefruit jelly

rosemary honey & grapefruit panna cottarosemary honey & grapefruit panna cotta

This is day 3 of a series celebrating local Toronto businesses!  Recent events have put many local businesses in a difficult position and unfortunately, it’s not clear when this situation will come to an end. For ten days I’ll be posting recipes inspired by some of my favourite local businesses as my own way of celebrating what they bring to our communities. While we may not be able to visit our local bakeries, cafes and restaurants right now, this is a way of keeping them in mind, and a reminder to support them again once there is a chance.

I’ll be honest: L’arc en Ciel is pretty much the model of my (utterly) fantasy bakery business I mull over in the back of my mind some days – there’s a day-to-day base of gelato (though in my imagined bakery it’s ice cream), with some supplementary, seasonal and creative baked goods. They are a relatively new Toronto bakery, having opened over the summer. They did temporarily closed before we could try much, but the selection of tarts, gelato cakes, and pastries in the display case are absolutely up my alley in what I would like to try (and try to bake).

Back in late summer I had tried some of their gelato with a friend. This is based on the wonderful combination of gelato and sorbet flavours I had (which was also featured in one of the bakery’s gelato cakes) – a creamy savoury-sweet honey rosemary gelato and a biting acerbic grapefruit sorbet. I’ve replicated the flavours and creamy/bitter contrast here, in a panna cotta infused with rosemary and honey, and a tart grapefruit jelly.

Continue reading “rosemary honey panna cotta with grapefruit jelly”

olive oil & vanilla panna cotta with berries

olive oil panna cotta tart

Recently I’ve been experimenting with making browned butter cream using my mum’s vintage Bel cream maker, which of course led me to wonder about other types of fats that could be emulsified into milk, such as an olive oil…

I made this olive oil cream by first whizzing olive oil and milk in a blender to generate a temporary emulsion, and the passed it through the cream make which generates more stable emulsion. The resultant cream takes on a lovely thick consistency and is extremely fragrant with olive oil! That being said, unlike the browned butter cream, which immediately tastes delightful, plain olive oil cream is more like a bland salad dressing or a very thin mayonnaise. But add a bit of sugar to it and vanilla, and it stops tasting like an indecisive sauce and wears the cloak of dessert wonderfully.

Bel cream maker
olive oil panna cotta tart

(The other question I had was: can I whip olive oil cream? I didn’t have very high expectations give the liquid nature of olive oil, but I gave it a try anyways. I got no further than some bubbles.)

This is a very simple dessert to highlight olive oil cream – an olive panna cotta with vanilla and berries. The olive oil cream has such a strong flavour that I only used about a third olive oil cream diluted with regular cream and milk. While the usual 100% cream panna cotta is obviously delicious, I like it to be partially milk to make it a bit lighter.

olive oil panna cotta tart

olive oil & vanilla panna cotta with berries

I think strawberries is nice, but you can use whatever fruit you have on hand. If you don’t want too many vanilla specks, which tend to sink to the bottom of the mold and thus show up on the top of the panna cotta, use vanilla extract instead.

olive oil cream

  • 100g milk
  • 50g olive oil

olive oil and vanilla panna cotta

  • 120g olive oil cream
  • 150g whole milk
  • 80g whipping cream
  • 3 tbsp granulated sugar (for a mildly sweet panna cotta, increase by a tablespoon or two depending on your preferences)
  • 3/4 tsp vanilla bean paste or extract
  • 1 1/2 tsp powdered gelatin bloomed in 1 1/2 tbsp cold water

to serve

  • 200g strawberries, sliced
  • a couple tsp granulated sugar
  • olive oil
  • basil

For the olive oil cream, heat the milk until warm and add the olive oil. Whiz the two together in a blender for a few seconds or until emulsified. Add to the top chamber of a cream maker and pump through.

For the panna cotta, place the olive oil cream, milk, whipping cream, sugar and vanilla in a small saucepan. Heat, whisking, until steaming, but don’t bring to a boil. Remove from the heat and add the bloomed gelatin. Stir until the gelatin is completely dissolved. Distribute the mixture into 4 glass ramekins or other mold, about 95-100g each. Cover and place in the fridge to set, at least 4 hours or overnight.

For serving, combine the sliced strawberries and granulated sugar in a container. Place in the fridge to macerate, at least a few hours or overnight.

When you’re ready to serve, unmold the panna cotta. First, press gently on the top surface of the panna cotta near the sides of the ramekin to loosen the edges from the mold. Get a dish of very hot water and place the mold in, ensuring the water level is high enough to come up the sides over the level of the panna cotta. Dip the panna cotta for about 15 seconds for a glass mold (if you’re using metal, 5 should be enough). Place a plate on top of the panna cotta and invert. If it doesn’t come out on its own, holding both the plate and panna cotta mold, quickly move them in sharp quick circles (in a plane parallel to the floor). If it still doesn’t come out, it may need to be dipped in hot water longer.

Top each panna cotta with strawberries, a drizzle of olive oil, and some basil.

Updated Jul 2023. The previous version was a panna cotta tart, but if you’re going to the trouble of making olive oil cream, this is an easier way to make use of it and better highlights the simple flavours!

olive oil vanilla panna cotta