strawberry, rhubarb & sumac crumb victoria sponge cake (& 9 nine years of tentimestea)

strawberry rhubarb sumac crumb victoria sponge cake

Hello again! Another post! And before the summer ends. Truly! It is still August by my calendar.

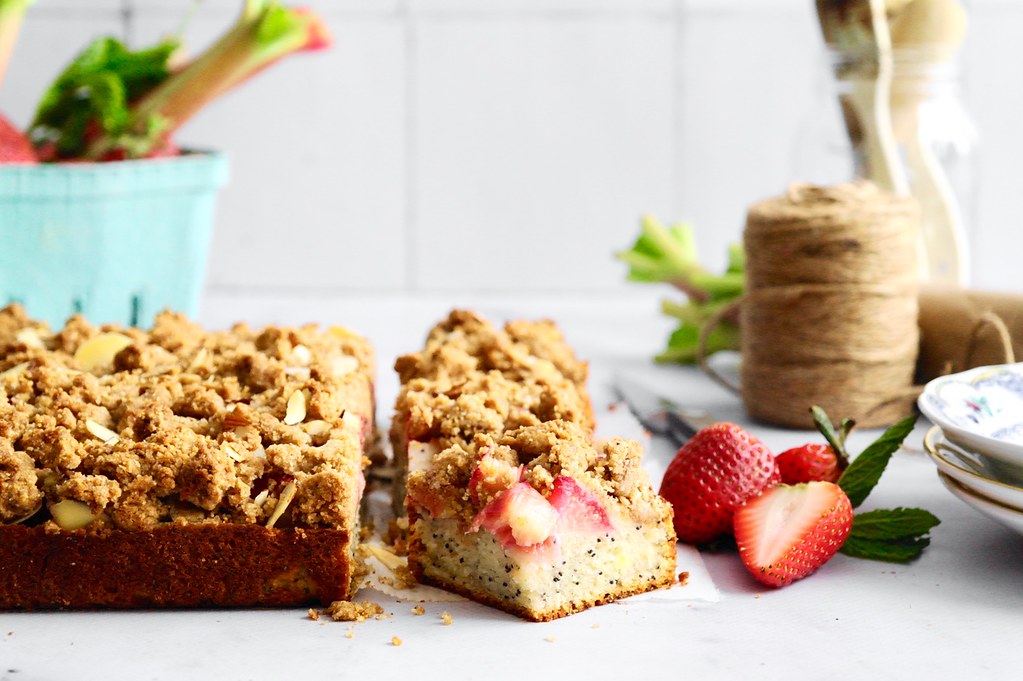
I usually do a rhubarb cake of some variety to commemorate another year of blogging – i.e. the convenient portmanteau that is the blogiversary. However, just as I am devoid of any novel commemorative thoughts on blogging, I wasn’t really feeling inspired for any sort of rhubarb cake this year. Not until my sister made a lovely rhubarb sumac crumb cake from Yossy Arefi’s Snacking Cakes, a vanilla cake base topped with rhubarb and a surprisingly fruity sumac-spotted crumble.

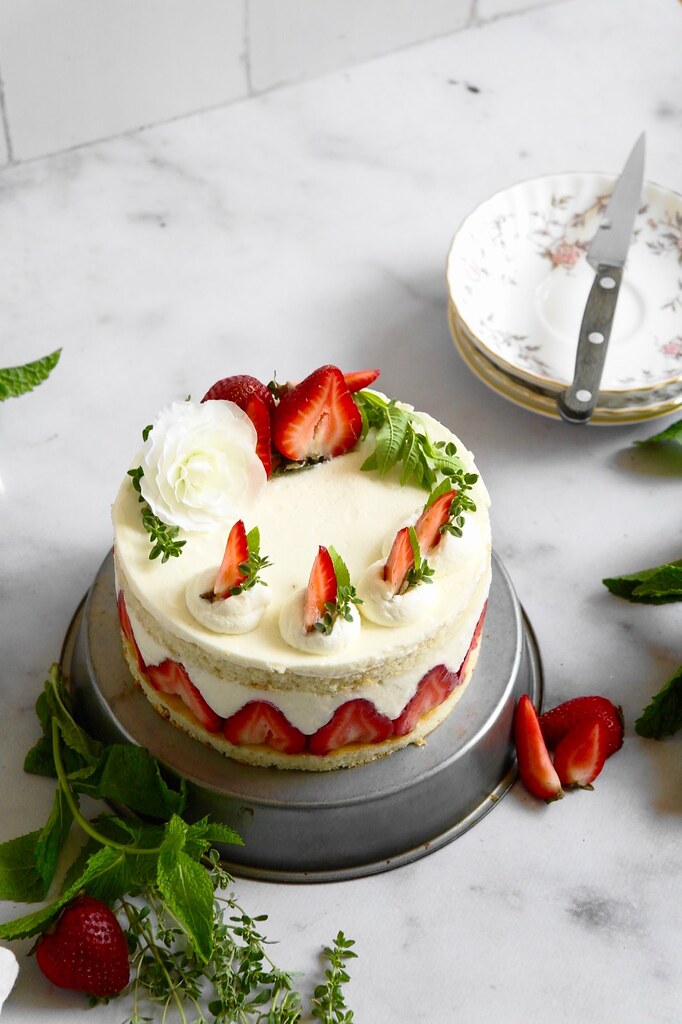
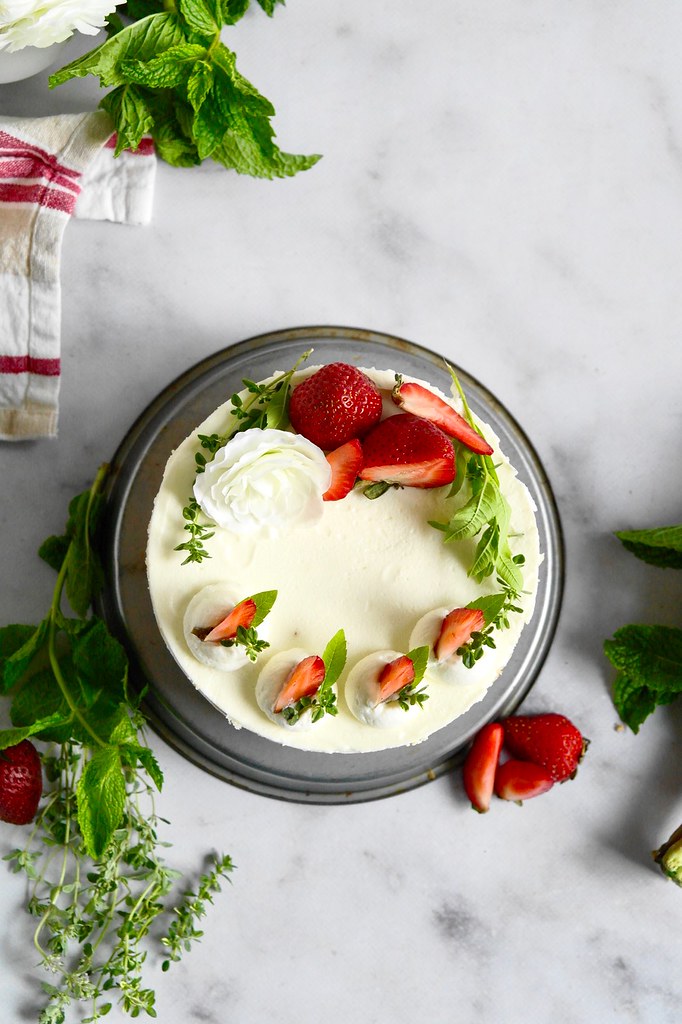
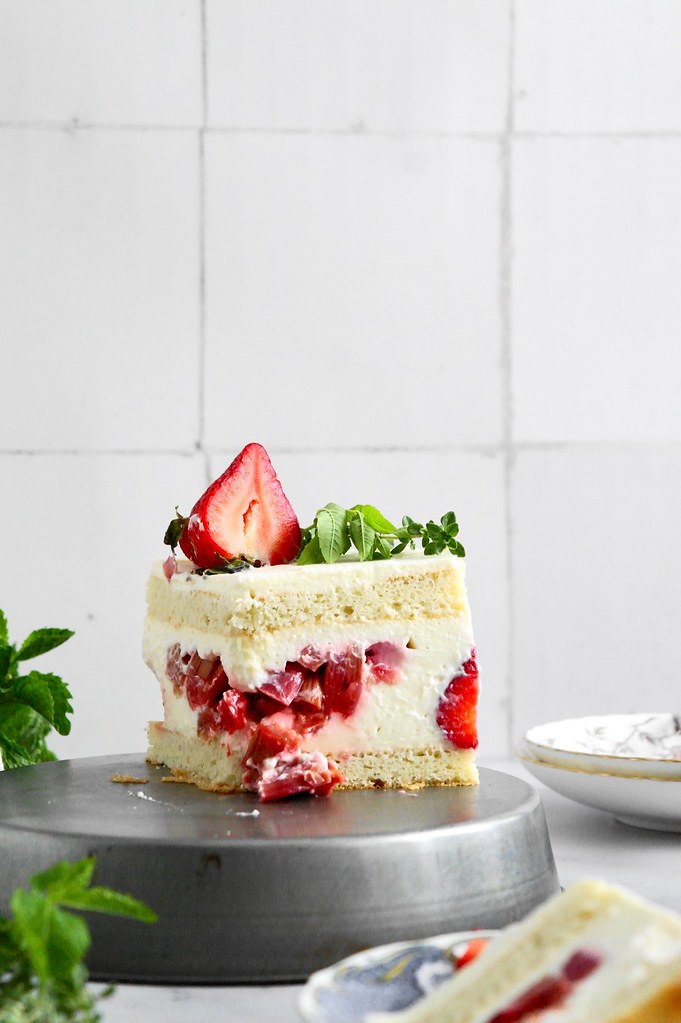
Inspired by that, I made this Victoria sponge. It’s a simpler cake, which may be a bit underwhelming for a !!-blogiversary-!! cake, though also rather appropriate… I think it’s a bit more emblematic of the type of baking I’ve been doing this past while, which has been simpler, quicker, and less fuss!

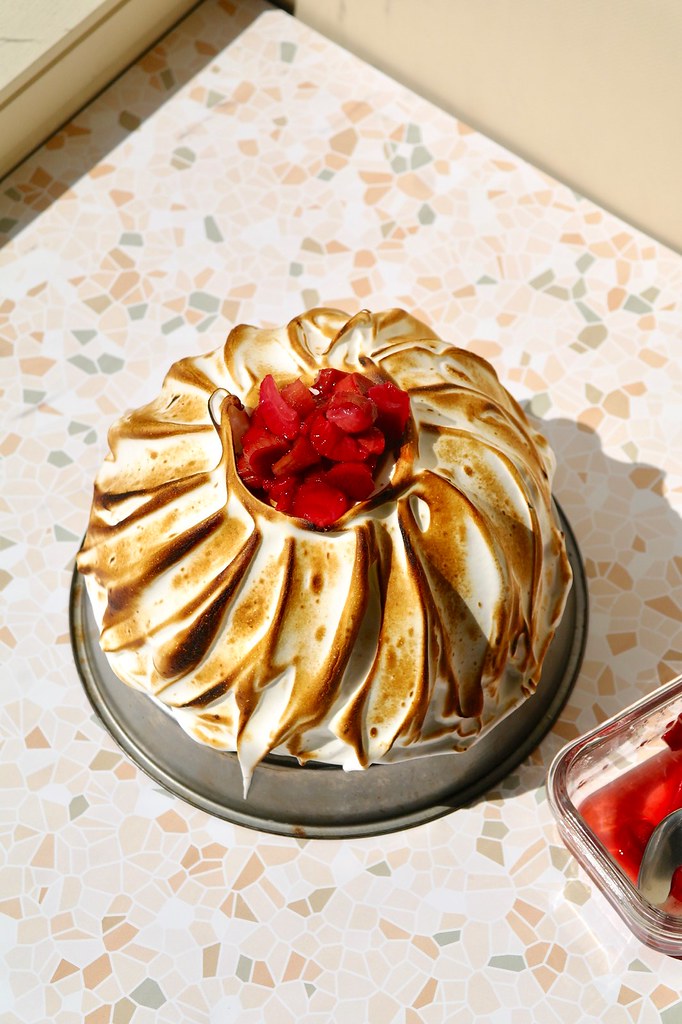
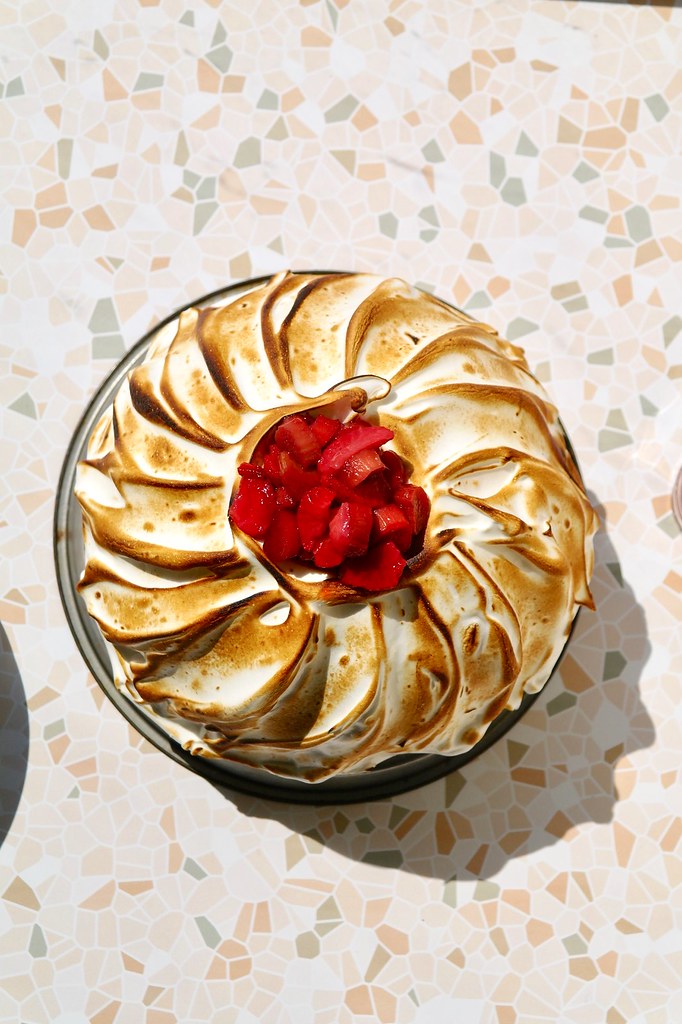
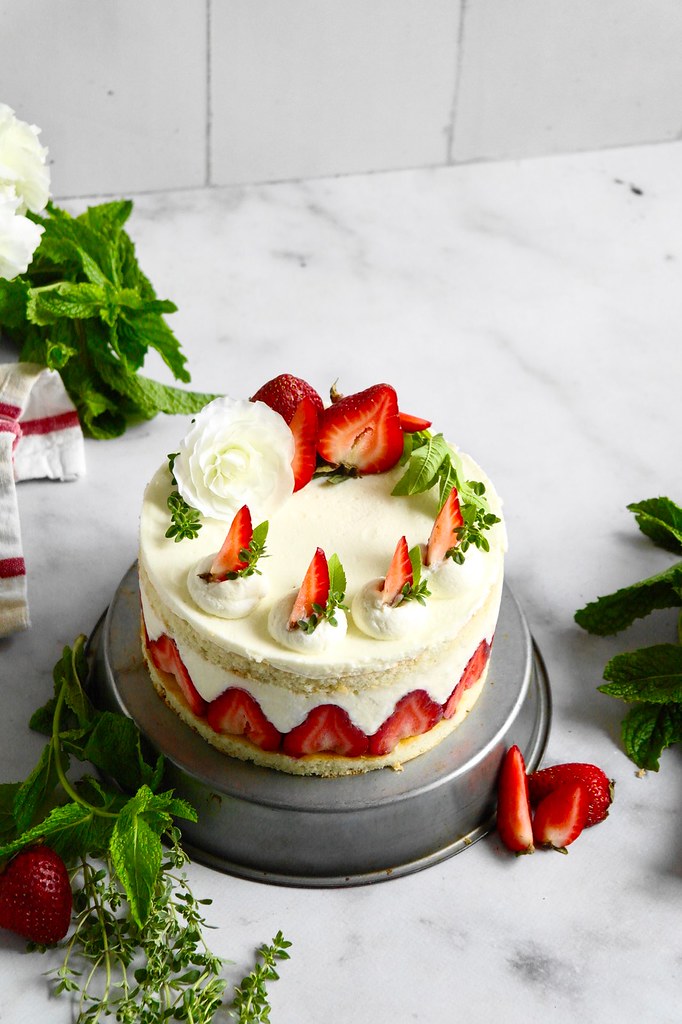
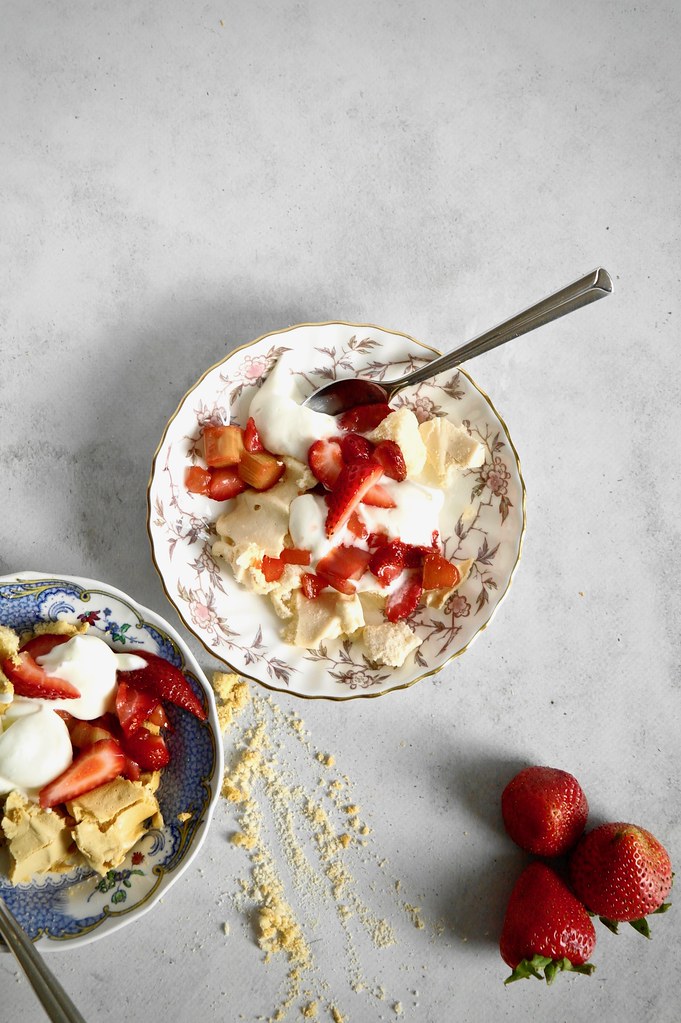
Taking inspiration from the sumac crumb cake, I’ve used ground sumac in both a crumb top and in the strawberry rhubarb jam layered into this cake. I think it goes so nicely in both – a bit lemon, a bit berry, and a very nice speckle.

strawberry rhubarb sumac crumb victoria sponge cake

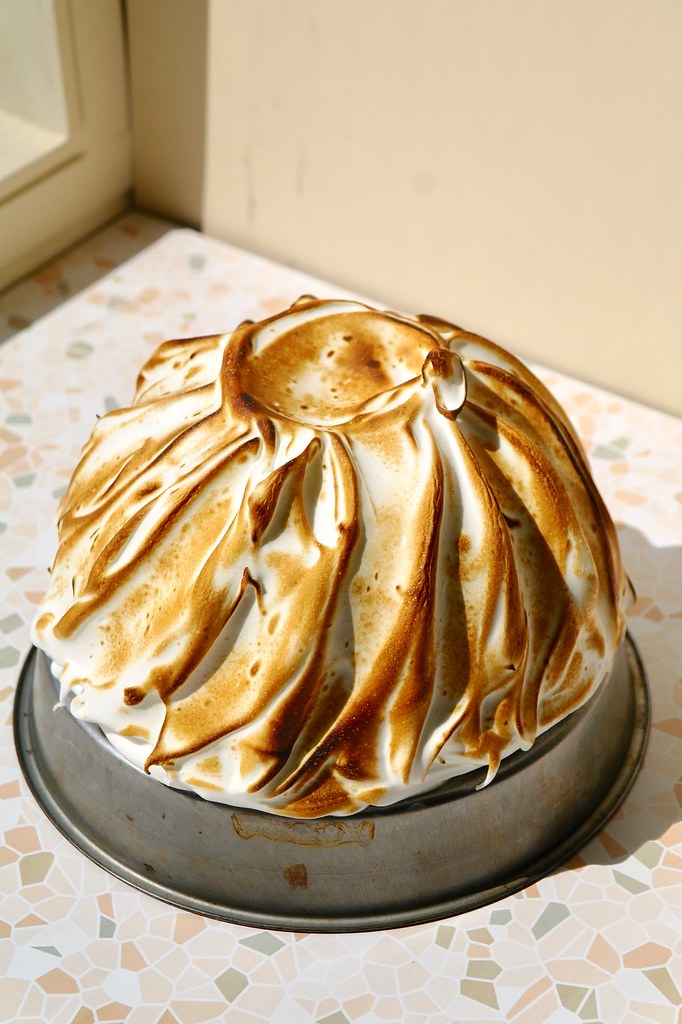
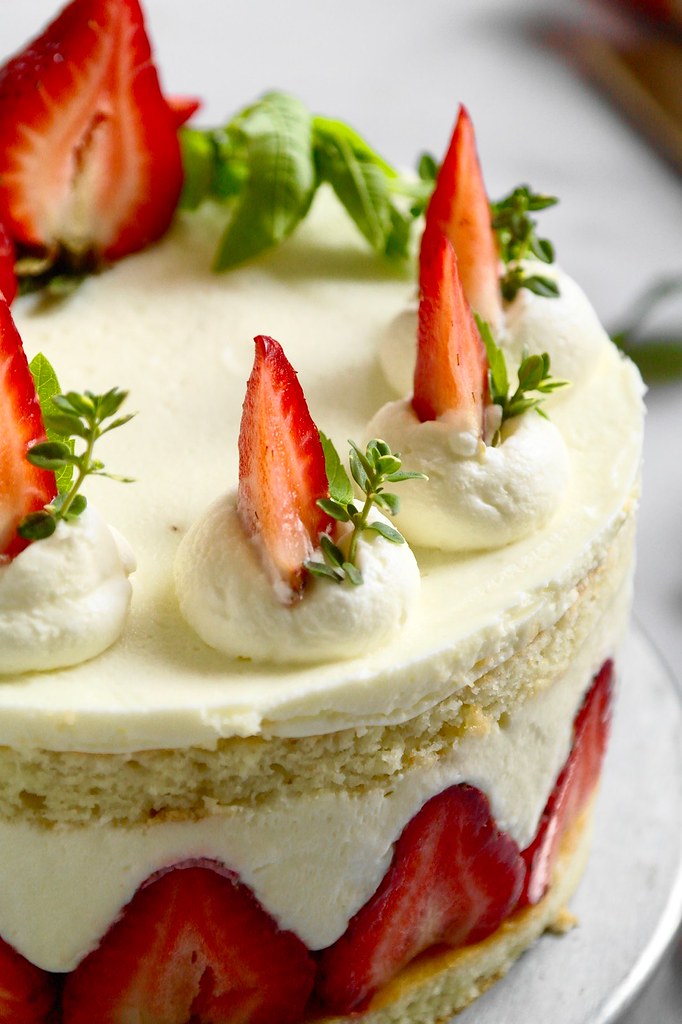
While I’m still calling this a Victoria sponge, it departs from the classic in a few ways… most glaringly, the crumb top!? If it doesn’t offend the senses too much, I hope you consider it! I ended up enjoying the extra texture, flavour and rustic topography. I did try a dusting of icing sugar over the crumb, but it looked better without, and no extra sweetness is needed anyways.

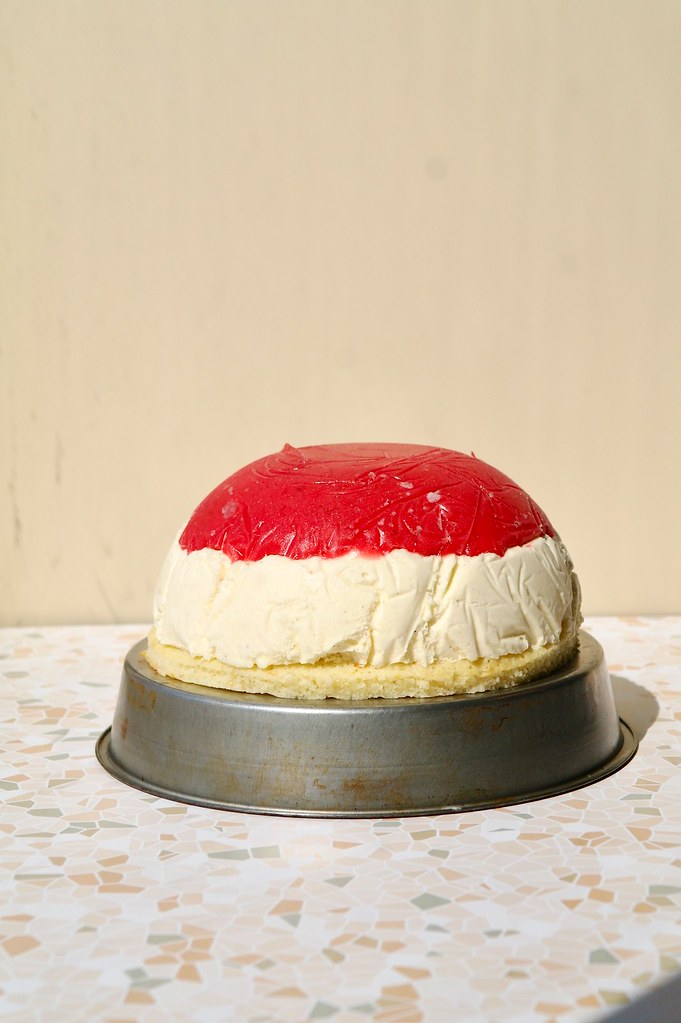
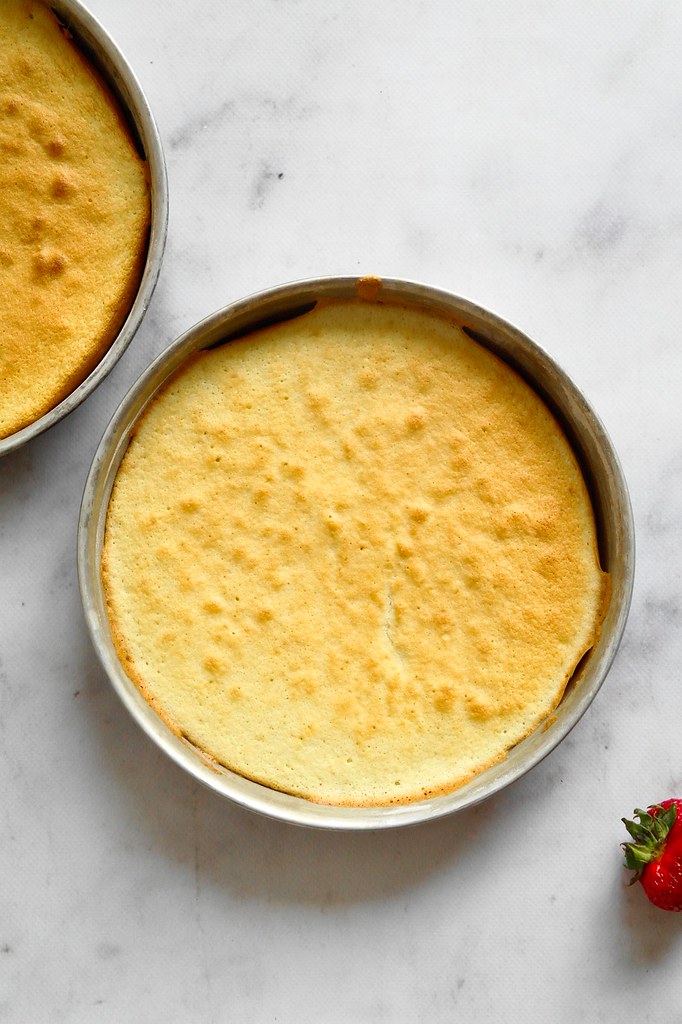
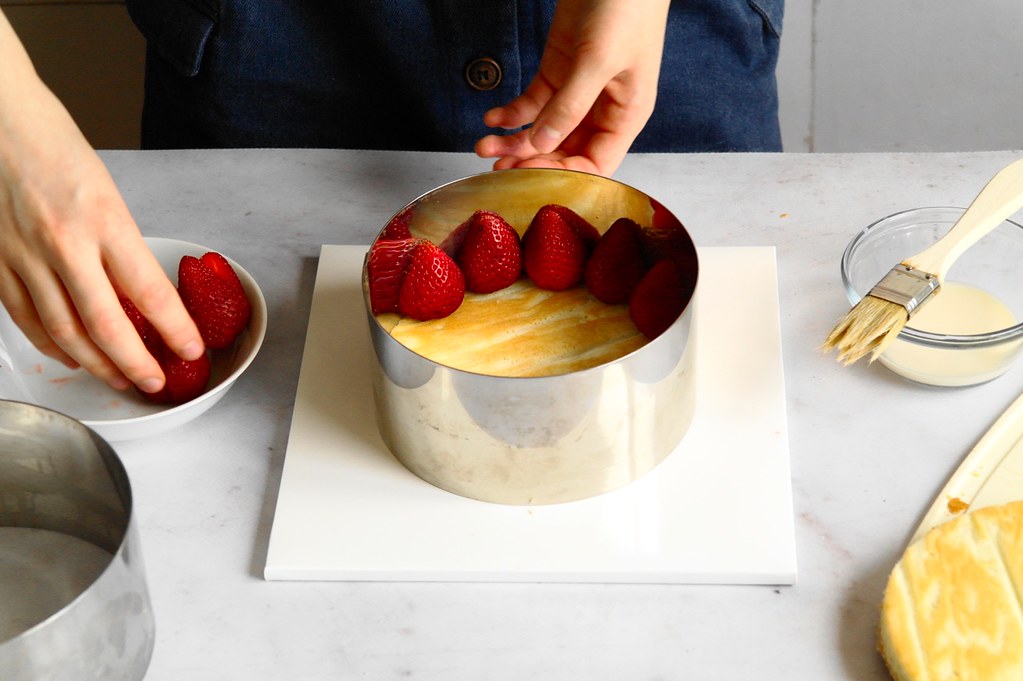
For simplicity, the cake is baked as a single layer with the crumb on top and then sliced in half to form the two layers, which is handy if you only have one cake tin. As well, though this really varies by recipe, I’ve made the cake layers a bit thinner than usual for a Victoria sponge. For one, this makes the cake a bit easier to slice, and secondly, (in my opinion) also means better ratio of cream to cake. I use enough cream that the cross section is roughly 1 cake:1 cream:1 cake.

While you can certainly go the buttercream route for a Victoria sponge, I always prefer the whipped cream. Cream does necessitate that leftover cake be stored in the fridge, which poses a bit of a conundrum: a filling that is best stored cold sandwiched between two layers of butter cake which are best eaten at room temperature. I’ve used 30% ground almonds in place of flour in this cake, in part because I always love nut cakes, but also because it gives the cake an extra tenderness which helps keep it more palatable if you need to eat the leftovers cold from the fridge.

strawberry rhubarb sumac crumb victoria sponge cake

strawberry, rhubarb & sumac crumb victoria sponge cake

  • Servings: one 7-inch or 18cm round cake
  • Print

Sumac crumb based on Yossy Arefi’s rhubarb crumb cake with sumac crumble from Snacking Cakes. Cake itself is adapted from a standard victoria sponge formula.

Note on the “jam” – this is made to be stored in the fridge and used soon and doesn’t have the sugar content or sterilization for long term storage like proper jam. Anyways, I really like to make this jam (really more of a very thick compote) for various baking projects – you can double the recipe and only stir sumac into half of it so you have another batch for eating/other bakes.

equipment: 18cm/7″ round springform tin

strawberry rhubarb sumac jam

  • 140g chopped rhubarb
  • 70g chopped strawberries
  • 25g granulated sugar
  • squeeze lemon juice
  • 1/2 tsp vanilla bean paste
  • 1 tsp ground sumac

sumac crumb

  • 42g butter
  • 15g brown sugar
  • pinch kosher salt
  • 1 tsp ground sumac
  • 47g whole wheat flour
  • 20g rolled oats

cake

  • 100g butter, softened
  • 65g granulated sugar
  • 1/2 tsp vanilla extract
  • 2 large eggs, at room temperature
  • 70g cake or all-purpose flour
  • 30g almond flour/finely ground almonds
  • 1 1/2 tsp baking powder
  • 1/2 tsp kosher salt
  • 1-2 tbsp milk

to fill

  • 200g whipping cream
  • 1 tsp granulated sugar, or to taste

For the jam, toss the rhubarb, strawberries and sugar together in a small saucepan.Warm the mixture over gentle heat until juices are released from the fruit. Then bring the mixture up a simmer. Cook, stirring frequently, until the fruit breaks apart and the mixture thickens, about 15 minutes. Stir in the lemon juice, vanilla bean paste and sumac. Transfer to a container, let chill, then store in the fridge.

For the sumac crumb, cream the butter, sugar, salt and sumac together. Add the flour, then the oats. Set aside.

For the cake, preheat the oven to 350F. Butter a 7-inch (18cm) springform tin and line the base with a circle of parchment paper.

In a mixing bowl, cream the butter and sugar with a wooden spoon until light. Beat in the vanilla and then the eggs, one at a time, until the mixture is as smooth as it gets, switching to a whisk as it becomes looser.

Whisk together the flour, almond flour, baking powder and salt. Add to the butter mixture and mix until just combined. Add 1 tbsp of milk, and a second if needed, to bring the batter to dropping consistency where it falls from the spoon.

Spread the batter into the prepared tin. Scatter clumps of crumble over top. Bake the cake for about 25-30 minutes or until an inserted skewer is removed clean or with only a few crumbs clinging. Let cool on a wire rack.

To assemble, use a long serrated knife to cut the cake in half. Due to the height of the crumbs, cut a bit below the mid line to make sure the top half still has enough cake – I find the crumb tends to pile up in the middle of the cake, so the cake will be a bit thinner there.

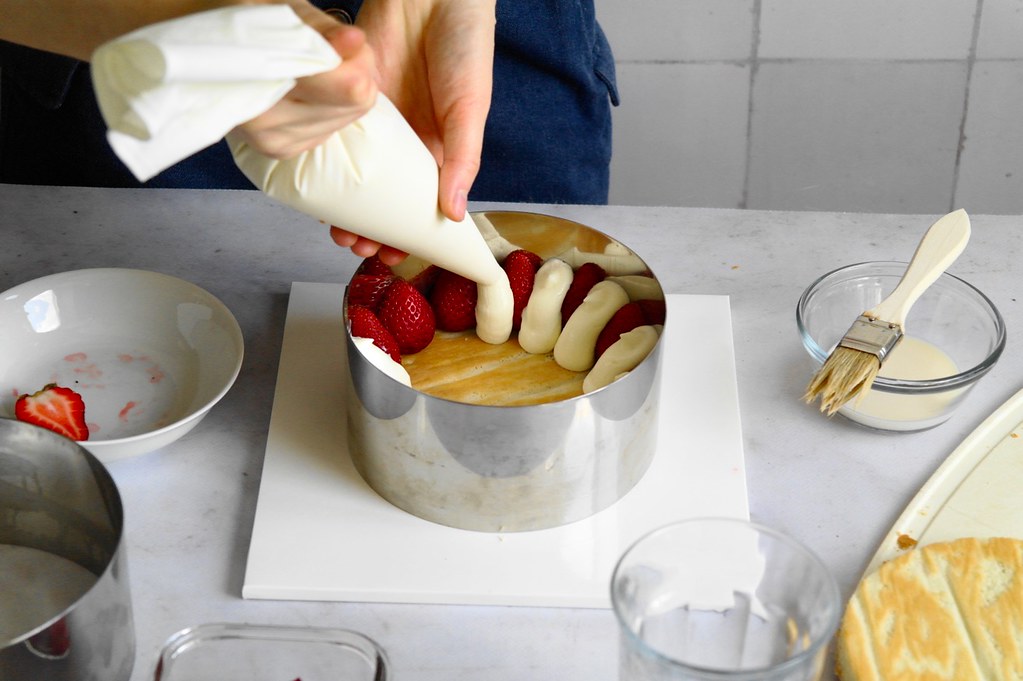
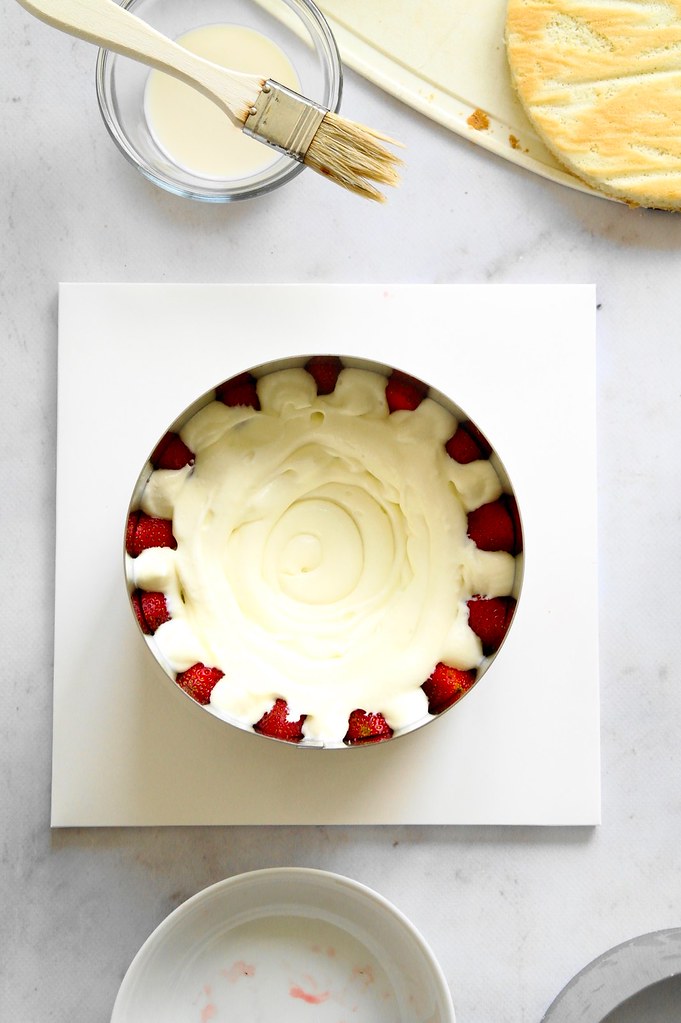
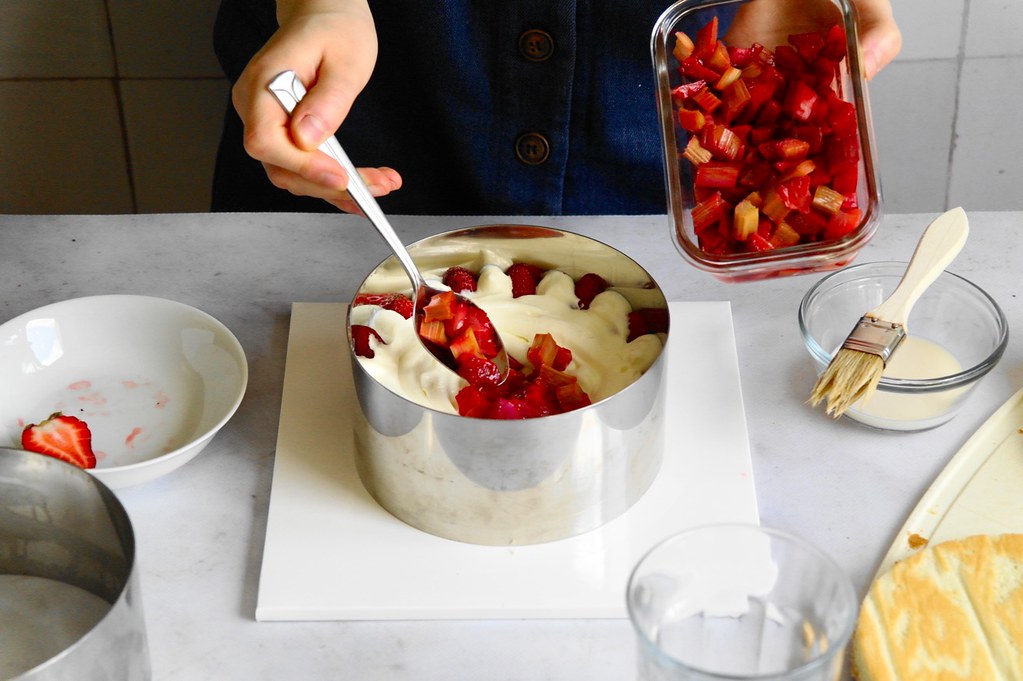
Whip the cream with 1 tsp sugar until it holds its shape. Transfer to a piping bag fitted with a large round tip (the one I used is 1.8cm in diameter). Spread the bottom half of the cake with the jam. Pipe mounds of cream around the edges, then fill in the middle with the rest of the cream, spreading to fill in any gaps if needed. Place the other half of the cake on top.

How do you cut this cake without the cream squishing out? Use a serrated knife and saw gently through the top layer of cake – don’t apply too much downwards pressure and just let the knife work through the cake for you. Chilling the cake will give the cream some time to firm which will help with clean cuts, but if you don’t mind a bit of mess, I think a Victoria sponge is best enjoyed not long after it is assembled while the cake is at room temperature and the cream is cold.

strawberry rhubarb sumac crumb victoria sponge cake

strawberry rhubarb baked alaska (& 8 years of tentimestea)

strawberry rhubarb baked alaska

Wait! Before summer is over! I’m a bit late, I know, but I still need to say something –

Well, actually… eight years of tentimestea… and it feels like I have less to say than ever!

But we’ll try. Around this time last year I was pondering what has stayed the same, but I suppose this year I found myself thinking more of what has changed.

Here’s one thing: my blog dwells happily in the comfortable depths of obscurity. But this year during rhubarb season, 99% of my traffic starting coming through pinterest for a single recipe. To be clear, minuscule traffic and hardly anything relative to what a popular blog would receive, but it was still a bit nerve-wracking! It was a recipe I was happy with and had tested a couple times. People on the internet that made it and told me about it were happy. Still, it did remind me that any recipe has the (slim) potential to be seen and made by others, and that there is a some responsibility that comes with that. I haven’t been trying to share nonsense recipes of course – but I will certainly never be doing that now.

Admittedly, up until the last couple of years, there were some old questionable recipes lying around. When I first started tentimestea – as a still-somewhat-teenager! that excuses everything, right? – it was to keep track of what I baked. That included disasters, which at the time were quite relishing to post given how terrible descriptions are much more exciting to write than good ones. I transitioned to sharing more proper recipes years ago, but there were still legacy recipes lying around. The posts remain, but the super old recipes I felt unsure about have been redacted to avoid anyone innocently coming across a recipe for disaster fully recorded in all its gory detail. (Well, you can still read the gory details, you just can’t replicate it!)

But all this talk of traffic and responsibility aside – first and foremost, the blog is still about having fun with baking – because that’s what has kept me around for eight years.

strawberry rhubarb baked alaska

onto the recipe: baked alaska!

As is sort of-semi-tradition-esque-ish, I make an annual (out of season) rhubarb cake. This year it’s baked alaska, a suitably retro recipe for an aging blog like mine. I made mine with a strawberry rhubarb sorbet layered over a vanilla elderflower semifreddo, all seated on an almond cake base, covered in meringue and some roasted fruit.

I was surprised by how much I enjoyed this cake! It’s fruit and cream (and yes, some rather sweet meringue) all stacked together in a refreshing slice. The amount of work makes for a decent project: multiple components, but none too tricky, and a relatively fuss-free assembly. You could also use this recipe as a template for whatever adaptations you want to make – another fruit sorbet, infuse some different flavours into the semifreddo, and so forth.

strawberry rhubarb baked alaska

components:

  • strawberry rhubarb sorbet: This is probably my favourite component of the cake – I would definitely eat it on its own! Made from strained rhubarb juice and strawberry puree, it’s the refreshing fruity counterpoint in this dessert. Sorbet usually needs a certain amount of sugar for texture, but it’s not overly sweet given the tartness from the rhubarb. I also helped keep it soft and sliceable a little splash of elderflower liqueur (more on that below).
  • vanilla elderflower semifreddo: I knew I wanted to have a bit of alcohol in the cake if only to keep it a bit softer and sliceable. Even better if it’s part of the flavour profile! I used a slightly lemony elderflower liqueur, St. Germain, to go along with the fruit and vanilla. You can certainly use whatever alcohol you prefer (or leave it out entirely for an alcohol free version – it will just be a bit harder and may need to sit on the counter for a few minutes to soften before slicing). Semifreddo is a foamy parfait made of whipped eggs and cream, making it a lot airier than ice cream and also a bit more manageable to eat when it comes to a generous slice. I also like using semifreddo as a component in layered frozen desserts as it doesn’t need to be churned; it can save a bit of time if you use a freezer canister which needs to be washed and refrozen for each churn.
  • almond financier base: I found that the texture of frozen financier is quite good – chewy and toothsome, but certainly still soft enough to bite – from this ice cream. Here it was recruited as the base for the cake.
strawberry rhubarb baked alaska
  • meringue: I usually don’t care much for meringue, but I discovered it’s surprisingly suitable for frozen desserts! Not only do you get to dramatically toast it for contrast with the cold filling, but meringue doesn’t harden when frozen (unlike, say, whipped cream) and also helps to insulate the cake to prevent it from melting too quickly on the counter. While I used raw egg whites, there are alternatives for food safety to reduce salmonella risk. I’d suggest trying something like an Italian meringue, in which boiling sugar is whipped in beaten egg whites, or Swiss meringue, in which the eggs and sugar are heated together before whipping. These methods can be a bit trickier though, so depending on what you’re comfortable with, simply whipping egg whites and sugar together is easiest.
  • roasted strawberries and rhubarb: I sort of modeled the look of my baked alaska after a pavlova, and so to finish it off, a garnish of roasted strawberries and rhubarb.
strawberry rhubarb baked alaska

a note on sizing…

I’ve described the bowl I used to make this in the recipe below (i.e. 900mL volume and 19cm top diameter) but this recipe can be amenable to whatever bowl you have on hand. If your bowl is bigger, the baked Alaska may just not fill the bowl the whole way. If your bowl is smaller, just layer in part of the sorbet and then part of the semifreddo. Put the remainders in separate containers and freeze to eat later. As necessary, trim the cake base so that it is the right size. Or, you can also multiply the recipe as needed if you want a larger baked Alaska.

To get an idea of how it might turn out, you can check the volume of the bowl you plan to use and compare it to what I used. The easiest way is to fill it with water and weigh how much it can contain (1g = 1mL). In this recipe I used a 900mL bowl with a top diameter approximately 19cm (7 1/2″). It may not sound that big, but it makes for quite the cake once it is covered in meringue. It can definitely serve eight or more very generously.

strawberry rhubarb baked alaska

strawberry rhubarb baked alaska

  • Servings: probably about 8
  • Print

Financier adapted from Thomas Keller and Sebastien Rouxel’s Bouchon Bakery, sorbet free-handed, semifreddo adapted from Stella Parks’s recipe, meringue adapted from classic ratios.

equipment: I made this in a bowl about 900mL in volume and with a top diameter of about 19cm/7 1/2″. But you can definitely use whatever size you happen to have on hand – please see the note on sizing in the blog post above. I also used a 8″ diameter cake tin to bake the cake base.

1. bake the financier base

  • 75g butter
  • 45g finely ground almonds
  • 30g all-purpose flour
  • generous 1/8 tsp salt
  • 60g granulated sugar
  • 75g egg whites
  • 3/4 tsp vanilla extract

Preheat the oven to 425F. Butter a 20cm/8″ diameter cake tin and line the bottom with parchment paper.

Place the butter in a small pan and heat until melted. Cook, stirring, until the butter solids brown and the butter is fragrant. Immediately transfer to a small bowl and set aside to cool while you make the rest of the batter.

Stir together the almond flour, flour, sugar and salt in a bowl. Add the egg whites and vanilla, and mix until a thick batter is formed. Whisk in the browned butter. Spread the batter into the prepared pan in an even layer.

Place in the oven and turn the temperature down to 350F. Bake about 10 minutes or until springy to touch or an inserted skewer is removed clean.

2. make the strawberry rhubarb sorbet as the first layer of the baked alaska

  • 350g chopped rhubarb
  • 150g fresh strawberry puree
  • 45g simple syrup (1:1 water and sugar)
  • 1 tbsp St. Germain (or other elderflower liqueur to taste; elderflower cordial could be an alcohol-free alternative)

Place the chopped rhubarb in a small saucepan along with a spoonful of sugar and a splash of water (enough for 1-2cm on the bottom). Together, the sugar and water should help draw the juice out of the rhubarb. Cook over medium allowing the rhubarb to release enough juice to mostly cover the rhubarb pieces. Let simmer until the rhubarb is tender and cooked through. (If it’s looking a bit dry it helps to put the cover on while cooking to generate more liquid. The resulting rhubarb juice will be less concentrated, so it will just need to be boiled down more in the following step.)

Transfer the cooked rhubarb to a jelly bag set in a sieve over a bowl and allow the rhubarb juice to drain in the bowl. Once cooled, squeeze the bag to extract as much juice as possible. (Discard the fibrous contents in the jelly bag.) With the cover off, I got about 170g of juice, and cover on, about 260g of juice. Exactly how much you get out will depend on how much water already cooked off. To make whatever amount you get consistent, place the rhubarb juice back into a small saucepan, bring to a boil, and cook down until it is reduced to about 120-130g.

Let the rhubarb juice cool. Stir in the strawberry puree, simple syrup, and St. Germain. Adjust the simple syrup to taste. Chill completely.

When ready to churn, line a bowl with plastic wrap. Churn the sorbet in an ice cream maker, then spread into the bottom of the bowl and place in the freezer to freeze completely.

3. make the vanilla elderflower semifreddo and pour over the sorbet

  • 3 large eggs
  • 35g granulated sugar
  • 185g whipping cream
  • seeds scraped from 1/2 vanilla bean + 1/2 tsp vanilla extract (or substitute 1 1/2 tsp vanilla bean paste for both seeds and extract)
  • 2-3 tbsp St. Germain (or other elderflower liqueur to taste; elderflower cordial could be an alcohol-free alternative)

Set a glass bowl over a pot of simmering water – or other double boiler set up. Whisk together the eggs and honey in the bowl. Mix continuously with a rubber spatula until the eggs appear syrupy and reach about 160-165F – though if you’re getting close to temperature (i.e. 155+) and you start noting any clumping, immediately remove from the heat and stop there. Transfer to the bowl of a stand mixer and whip until the bowl feels cool to the touch and the eggs have quadrupled in volume – and in the words of Stella Parks (original recipe) “thick enough to briefly mound up like soft-serve ice cream when dropped from the whisk.” This may take 5-8 minutes.

Meanwhile, whip up the cream with the vanilla seeds and extract. Whisk in the St. Germain at the end (use more or less depending on your taste). Add half of the whipped cream to the eggs and whisk in until combined. Add the remaining cream, folding it in gently with a rubber spatula. Pour the semifreddo over the sorbet in the prepared bowl, leaving just enough room for the financier. You will have extra semifreddo if you use the same size bowl as me – put the leftovers in a container and freeze as a dessert for later.

Trim the financier base as necessary so it can fit into the bowl and place over the semifreddo. Return to the freezer and allow to freeze completely.

4. (optional) roast the fruit as an optional garnish, and chill until use

  • 50g chopped rhubarb
  • 50g chopped strawberries
  • 1 generous tsp sugar

Preheat the oven to 350F. Line a small baking pan with parchment paper. Combine the 50g each of chopped rhubarb and strawberries with a bit of sugar and transfer to the pan. Bake for about 25 minutes, mixing partway through, until the fruit is tender. Chill completely until ready to use.

5. make the meringue and cover the baked alaska

  • 90g (3 large) egg whites
  • pinch cream of tartar
  • 90g granulated sugar

Place the egg whites in the bowl of a stand mixer. Whip until frothy and sprinkle in a pinch of cream of tartar. Beat until the egg whites and foamy before gradually adding the sugar. The continue to whip on high speed until firm peaks are formed. (I find you get a smoother swoopier meringue if you stop at firm peaks rather than stiff. Peaky, yes, but still nice and soft.)

Take the bowl out of the freezer and turn out onto a tray or upside down-baking tin. Remove the plastic. Cover with meringue and then use the back of a spoon to draw meringue up the sides. Use the spoon to make a nest in the top to hold the roasted fruit.

At this point, you can either torch the meringue or do a quick bake in a very hot (500F) oven until the meringue is browned. If you’re not ready to serve right away, the cake can be put back in the freezer until ready. Top with roasted fruit just before serving.

Note: the egg whites won’t be fully cooked this way, which does post some food safety risk. Be sure to do what is best for you! Some other ideas could be making an Italian or Swiss meringue in which the egg whites get additionally heated.

for posterity – past tentimestea birthday rhubarb cakes

coconut, lychee & strawberry shortcake

strawberry lychee coconut shortcake

This is a take on a Japanese style strawberry shortcake – sponge cake, cream, strawberries – but layered with coconut milk bavarian cream, strawberries and lychees. Not to miss out on the cream, the whole thing is topped with a nice thick layer of it. Between a milk soak for the cake layers, the mousse, fruit and cream, it makes for a wonderfully moist cake!

strawberry lychee coconut shortcake

I had a lot of fun making it, though there are a couple tricky bits – be sure to let the cake set completely before un-molding and slicing. Use a long serrated knife to slice the cake with a gentle sawing motion in order to work your way through each of the layers.

strawberry lychee coconut shortcake

coconut, lychee & strawberry shortcake

  • Servings: about 8 from a 6-inch square cake
  • Print

Genoise from Spoonful Passion – you could make do with a 3/4 recipe, but this makes sure you have enough cake in case it turns out a bit stout.

special equipment: square 6″ cake tin 2″ tall with a removable bottom (alternatives could be a 7″ round springform tin)

genoise

  • 4 large eggs
  • 75g granulated sugar
  • 10g honey
  • 113g cake flour, sfited
  • 18g butter
  • 20g milk

coconut bavarian cream

  • 180g full fat coconut milk
  • 20g granulated sugar (you can use more if you prefer sweeter desserts)
  • 3 egg yolks
  • 1 3/4 tsp gelatin bloomed in 2 tbsp water
  • 180g whipping cream

assembly

  • 3 tbsp milk
  • a few drops vanilla extract
  • about 250g strawberries, hulled and thickly sliced
  • about 80g chopped lychees
  • an addition ~150g whipped cream, sweetened to taste
  • more strawberries to garnish

genoise

Preheat the oven to 350F. Line the tin with parchment paper; an easy way to line a square tin is to use two slings of parchment paper, one going in each direction to cover all the sides.

Whisk together the eggs, sugar and honey in a glass bowl and set over a pot of simmering water. Whisking constantly, heat the mixture until lukewarm to touch or around 100-105F. Pour into the bowl of a standmixer fitted with the whisk attachment.

Place the milk and butter together in a small glass bowl and set in the hot water to warm and melt. (I put a small steaming rack in the bottom of the pot so the water level isn’t too high).

Now return to the eggs: whip on high until the mixture is fluffy but still ribbony. You’ll know it’s ready when you can draw a figure eight with batter flowing from the whisk and it can hold its shape on top of the batter. Whisk on low for one more minute to help reduce any large air bubbles.

Add half of the sifted flour overtop and fold gently until just combined. Repeat with the remaining flour. The milk and butter should be warm by now – remove from the pot and add a dollop of the batter, and mix until cohesive. Add this to the rest of the batter and fold until just combined.

Transfer the batter to the prepared pan. Bake about 35-40 minutes or until browned an inserted skewer is removed clean. Let cool completely.

Once cooled, trim the top of the cake flat and slice into 1cm thick layers – you’ll only need three, but you’ll probably have enough cake to cut four. To do this, I find it’s best to use a ruler to mark on all four sides of the cake and trace a shallow cut. Then, while slicing the cake, you can follow those as a guide to make sure you get even layers.

bavarian cream

Once the mousse is made, it will need to be used soon – keep that in mind before you start and be sure to read ahead to the assembly portion of the recipe so you know what you’ll need.

Whisk together the coconut milk, egg yolks and sugar in a glass bowl and set over a pot of simmering water. Cook, stirring constantly with a rubber spatula, until the mixture reaches about 160F. Remove the bowl from the pot and add the bloomed gelatin, stirring until melted. Then set aside to let it cool to room temperature, giving it an occasional stir so that it cools evenly (this can be sped up by placing the bowl in another bowl of ice water but be careful to stir more often and make sure it doesn’t set completely).

Meanwhile, whip the cream – you can keep it in the fridge until the custard is cool enough. Whisk about one third of the whipped cream into the coconut milk mixture to lighten and thicken it, then add the remaining whipped cream and fold until combined. You’re now ready to assemble the cake.

assembly

Stir together the 3 tbsp milk and vanilla extract in a small bowl.

Place a layer of cake into the bottom of the same tin you baked the cake in. Brush with a bit of the milk. Arrange a layer of strawberry slices over the cake and scatter with half of the chopped lychees. Pour about half of the mousse overtop to cover the fruit. Give the pan a couple a couple taps on the counter to help the mousse settle around the fruit. Now repeat this for another layer of cake, milk soak, strawberries, lychees and the remaining mousse. Put a final layer of cake on top and brush with milk.

There will be a bit of a height left between the cake and the top of the pan – take the whipped cream and spread it into a smooth layer over top the cake flush with the top of the pan. (The amount you need to fill up the pan might vary depending on the thickness of your cake layers and fruit. I found about 150g of whipped cream was sufficient for a 1.5cm layer of cream.) Chill the cake for at least a few hours or preferably overnight to allow the mousse to fully set.

Wrap a towel soaked in hot water around the pan for about 10 seconds, and then push the removable bottom up to unmold the cake. Cut in half and then cut each half into four slices. Top with a strawberry half if desired.

strawberry lychee coconut shortcake

strawberry matcha pandan chiffon cake

matcha pandan strawberry chiffon cake

The flavours of this cake were inspired by the matcha pandan latte at the cafe Rustle & Still. I’ve made something inspired by this combination before, in these matcha pandan brownies where pandan takes the place of vanilla extract in the brownie base; it’s a nice brownie with a matcha topping and a subtle pandan, but it is first and foremost a chocolate brownie, which doesn’t quite do the matcha-pandan combo justice. This time I wanted to be able to taste (and see!) both flavours more clearly, which resulted in this pandan chiffon cake covered with matcha whipped cream and filled with fresh strawberries.

matcha pandan strawberry chiffon cake

This cake has an intensely green centre from the pandan paste which is hidden by the relatively mild and subtle green of the matcha cream – until you cut the cake open! I think it’s a lovely simple strawberry layer cake for summer!

As I don’t have a tube pan, I approximated one by combining a springform tin with an empty drink can in the centre. Of course if you have a tube pan, that is probably simpler to use, but this trick is handy for getting that tube pan shape. For a smaller 18cm/7″ “tube pan” you’ll need a narrower drink can than the standard pop can, only about 2″ in diameter. They’re relatively common – I had one lying around with a coconut water drink in it. Some carbonated drinks are also sold in these narrower cans, so keep your eye out.

matcha pandan strawberry chiffon cake

strawberry matcha pandan chiffon cake

  • Servings: one 7-inch cake
  • Print

Makeshift tube cake pan method adapted from epicurious. Chiffon cake adapted from Make Fabulous Cakes.

special equipment: 18cm/7″ springform + a narrow ~5.5cm/2″ diameter empty drink can to approximate a tube pan (similar to as seen here, but on a smaller scale) OR a 7″ tube pan

pandan chiffon cake

  • 105g all-purpose flour
  • 1 tsp baking powder
  • good pinch salt
  • 3 eggs, separated
  • 68g whole milk
  • 56g vegetable oil (or ~67mL)
  • 1 tsp pandan extract
  • pinch cream of tartar
  • 65g granulated sugar

to fill and assemble

  • 360g heavy cream
  • 1 tbsp matcha
  • 1 1/2 tbsp granulated sugar, or to taste
  • sliced strawberries

For the chiffon cake, preheat the oven to 325F. Begin by preparing the pan. Line the bottom of a 7″ springform with parchment paper. Butter and flour the sides. Take a narrow empty drink can about 5.5cm in diameter and wrap a piece of parchment around the can, securing it with a piece of string. Put about 2-3 tbsp of water in the can to weigh it down, and place it in the centre of your springform tin. Tube pan approximated!

Now for the actual cake… whisk together the flour, baking powder and salt in a bowl and set aside. Separate the eggs and in a large mixing bowl place the egg yolks along with the milk, oil and pandan extract. Whisk to combine.

Put the whites in the bowl of a stand mixer along with the cream of tartar. Beat until frothy, then sprinkle in the sugar and whip on high speed until nearly stiff peaks.

Meanwhile, add the dry ingredients to the egg yolk mixture and whisk until just combined. Add a large scoop of the egg whites and whisk until mixed in to lighten the batter, then add the remaining whites and gently fold until just combined. Carefully dollop the batter into the prepared tin – I found it’s best transfer scoops of batter all around the pan to not knock over or shift the can in the centre.

Tap the pan on the counter a couple times to pop any large air bubbles, then bake about 40-45 minutes or until an inserted skewer is removed clean.

Carefully tip the pan upside over the sink so any remaining water in the can drains, then let the cake cool upside down, balancing on the drink can in the centre.

To assemble, whip the cream with the matcha and granulated sugar (I found 1 1/2 tbsp was enough to counteract the bitterness of the matcha, add more to taste if you prefer a sweetened whipped cream).

Remove the completely cooled cake from the pan and slice in half. Spread some whipped cream on the bottom half of the cake and arrange strawberry slices overtop. Top with some more whipped cream and spread into an even layer. Put the top half of the cake back on, then cover the cake entirely with the whipped cream.

To garnish, if you like, transfer some softly whipped cream to a piping bag with a large round tip and pipe dollops on top, and swoop a spoon through them. Arrange some strawberry halves over top of the cake as well.

It is best to chill the cake at least an hour before slicing and serving – it let the cream firm up a bit and will make the slicing process a bit tidier.

matcha pandan strawberry chiffon cake

strawberry rhubarb & poppy seed coffee cake

strawberry rhubarb poppy seed coffee cake

it is my favourite season: rhubarb season! I haven’t actually baked anything with rhubarb yet this spring, but I do have this cake from last year – a fruity, crumbly take on a coffee cake made with a yoghurt poppy seed cake, chopped strawberries and rhubarb, and a topping of spiced almond crumb.

The wonders of coffee cake: it’s dessert and it’s breakfast! Also okay for lunch! Honestly, any meal!

strawberry rhubarb poppy seed coffee cake

This cake was inspired by Brown Bear Bakery, a bakery I would love to one day visit! I am always excited by the combination of strawberry, rhubarb and a whole grain streusel – I love using this combination in one way or another as another homage to the strawberry rhubarb crumbles (aka the number one and also only dessert) that I grew up with.

strawberry rhubarb poppy seed coffee cake

strawberry rhubarb & poppy seed coffee cake

  • Servings: 8-inch square cake
  • Print

Cake inspired by Brown Bear Bakery. Crumb adapted from Epicurious. Cake adapted from the sour cream coffee cake recipe in A Good Bake by Melissa Weller.

equipment: 8-inch (20cm) square baking pan

spiced almond crumb

  • 85g butter, melted
  • 40g brown sugar
  • ½ tsp ground cinnamon
  • ¼ tsp ground ginger
  • ¼ tsp ground cardamom
  • pinch nutmeg
  • ¼ tsp kosher salt
  • 100g whole wheat flour
  • 25g finely ground almonds
  • 2 tbsp flaked almonds

poppy seed & yoghurt coffee cake

  • 120g all-purpose flour  
  • 60g whole wheat
  •  1 tsp baking powder
  • ½ tsp kosher salt
  • 12g (about 1 tbsp + 1 tsp) poppy seeds
  • 1 stick butter, softened
  • 100g granulated sugar
  • finely grated zest of ½ lemon
  • ½ tsp vanilla extract
  • 1 large egg, at room temperature
  • 225g greek yoghurt (or sour cream)

fruit

  • 140g rhubarb, chopped
  • 140g strawberries, chopped
  • 1 tbsp granulated sugar
  • 1 tsp tapioca starch

For the crumb, melt the butter in a microwave-safe bowl. Add the sugar, spices and salt and stir to combine. Then add the flour and ground almonds and stir until combined. Break up into lumps and toss in the flaked almonds.

For the cake, preheat the oven to 350F. Butter an 8″ square tin and line with a parchment paper sling.

Whisk together the flours, salt, baking powder and poppy seeds. Place the butter, sugar and lemon zest in the bowl of a standmixer and cream until light and fluffy (or by hand with a wooden spoon). Add the vanilla and egg and beat until combined. Finally, whisk in the yoghurt. Add the flour mixture and stir with a wooden spoon until just combined. Dollop into the bottom of the prepared tin and spread into an even layer with an offset spatula. The batter will be thick.

For the fruit, toss together the fruit, sugar and tapioca. Scatter over the batter.

Finally, scatter the crumb overtop of the cake. Squeeze a bit of the crumb mixture in your hands so it holds together in lumps and then break it up over the top of the cake.

Bake at 350F for about 40 minutes (do a first check at 30 minutes) or until an inserted skewer is removed clean or with just a couple crumbs clinging to it. Let cool completely on a wire rack, then cut into squares.

earl grey roll cake with strawberry rhubarb jam

strawberry rhubarb earl grey roll cake

Do you struggle with writing or putting together a blog post? Do you sit at your laptop intending to write, but then instead eat a cookie? Does each word you write feel as though it was scraped from your palate with a particularly prickly plastic butter knife?

If so, this is what I have for you: a free sample of a new entrepreneurial venture called Blog-Aid.

Blog-Aid provides posts which come in bundles of four to set you up for one month’s worth of weekly posts. Each post is designed to be sufficiently generic to be able to be applied to hundreds of different types of blogs (though specialty packs for capybara fan club blogs are in the process of being developed and will be available for an additional charge).

What is truly innovative about this product is that you can customize based on the amount of inspiration and time you have. If you have time, fill in the blanks using your own words! Or do it based off of the hand-crafted and carefully curated phrases that we’ve assembled. No time at all? Need to get in a post before midnight and it’s 11:59:59? No worries–we also have a one-click blogging option to fill in the blanks at random, using phrases that align with one of our Blogger Personality Profiles (our five most popular personalities: Biting Critic, Charismatic Charmer, Kool Kidzzz, i only write in all lowercase, and I ONLY WRITE IN ALL UPPERCASE).

You will see in the following sample how we accomplish the following objectives: 1) make a sudden, exciting reveal! 2) appeal to our reader base 3) reference our picturesque childhood and d) demonstrate our personal development and growth. All while ensuring that your posts are the furthest from template, but glow with personality and individuality.

_______________ [Hello readers/Dear lovely readers/HI],

I just spent the last week _______ [writing scathing reviews/thinking about my dear readers/WRITING IN ALL UPPERCASE]. But as _______ [thrilling/charming/UTTERLY UPPERCASE] as that was, I just couldn’t wait to publish this post to tell you all about ________ [my latest harsh takedown/how much I love my dear readers!/THIS NEW FONT I FOUND WHICH ONLY HAS UPPERCASE].

As my valued readers, you are the first ones that I thought of while I _______ [bottled the tears of the subjects of my reviews/dreamed of my dear readers!/TAPED DOWN THE SHIFT KEY]. You see, back in the days of my childhood ______ [I wrote scathing reviews about my preschool teachers/I wished I had such dear readers!/I LEARNED SUBTLETY IS KEY]. Today, I’ve [eaten lunch and hated it/been so grateful for my dear readers!/TYPED WITH VIGOUR].

___________ [Thanks for reading/While we may part for now, my dear readers, we will reunite soon!/GOODBYE].

(See the Charismatic Charmer in action here!)

There you have it! Blog-Aid. Just post it.

strawberry rhubarb earl grey roll cake

The nonsense I make up in order to avoid writing a blog post…

This is another quick and simple roll cake, made with an earl grey chiffon, strawberry rhubarb jam, and earl-grey infused cream. This cake is light, tart, creamy, and moist. It is no surprise that jam and cream is wonderful together!

The part I am most excited about is the earl grey-infused cream. In the past I’ve attempted tea-infused whipped cream, but would find that it did not whip up very smoothly, something which I attributed to heating the cream and the tannic content of tea. Lately I’ve been doing more cold overnight infusions, the key benefit being that you can infuse the cream without heating it up. When applied here, it also it means that the infused cream whips smoothly!

strawberry rhubarb earl grey roll cake

earl grey roll cake with strawberry rhubarb jam

  • Servings: 1 roll cake which can be sliced into 6-8 pieces
  • Print

Sponge cake recipe adapted from Rice ‘n Flour.

earl grey cream

  • 150g heavy cream
  • 5g earl grey tea

strawberry rhubarb vanilla jam

  • 140g chopped rhubarb
  • 90g chopped strawberries
  • 30g granulated sugar
  • 2cm length of vanilla bean
  • optional: a few chopped cherries, for boosting the colour

earl grey roll cake

  • 1 tsp loose leaf earl grey tea
  • 3 eggs, split
  • 45g sugar
  • 30g whole milk
  • 30g oil
  • 1 tsp houjicha powder or cocoa powder whisked with 1 1/2 tsp boiling water, optional (see note at end)
  • 22g corn starch
  • 23g a.p. flour
  • pinch salt
  • pinch cream of tartar

filling & assembly

  • about 2 1/2 tsp of granulated sugar to sweeten the filling, or to taste
  • 60g whipped cream whipped with 1/2 tsp sugar for piping on top
  • sliced strawberries for garnish (alternatively, try poached rhubarb like here)

For the earl grey-infused cream, combine the cream and loose leaf tea in a container. Place in the fridge to infuse overnight. The next day press through a sieve – you should get around 120g of infused cream out. It will be a bit bitter now, but we’ll add sugar later when we whip the cream for the cake.

To make the strawberry rhubarb jam, toss the rhubarb, strawberries and sugar together in a small saucepan. (If you’re adding cherries for colour, add them now as well – especially if your rhubarb is more on the green side.) Split the length of vanilla bean, scrape the seeds from the middle and add to the mixture. Add the pod as well.

Warm the mixture over gentle heat until juices are released from the fruit. Then bring the mixture up a simmer. Cook, stirring frequently, until the fruit breaks apart and the mixture thickens and resembles a jam, about 20 minutes. Look for a dollop of jam dropped from the spoon to roughly hold its shape.

Transfer to a container and chill completely.

To make the roll cake, preheat the oven to 350F. Line a quarter sheet pan with parchment paper (I recommend the method in the original source recipe video for ease and nice sharp edges on the cake).

Grind the loose leaf earl grey in a small spice grinder until ground as fine as it can get – pass through a sieve and discard any larger pieces of leaves. Set aside.

To make the cake, whisk together the egg yolks with the oil and milk. Optionally, for colour, whisk 1 tsp of houjicha or cocoa powder with 1 1/2 tsp boiling water until smooth, then add it to the egg yolks and whisk in. Sift the flour and cornstarch over top, add the salt, and whisk in until completely combined. Whisk in the ground earl grey tea leaves.

In a stand mixer, whisk the egg whites with the cream of tartar until frothy, then sprinkle in the sugar and whip until stiff peaks are formed. Fold one dollop of the egg whites into the batter completely before adding the remainder and folding in lightly. Scrape into the prepared pan, level with an offset spatula and tap to release any large air bubbles.

Bake around 15 minutes or until lightly browned, springy, and an inserted wooden skewer/toothpick is removed clean. Let cool on a wire rack.

To fill and assemble, begin by whipping the earl-grey infused cream. Whisk in about 2 1/2 tsp of granulated sugar, or sweeten to taste.

To assemble, place the cake right side up (i.e. with the bottom of the cake facing down to become the outside of the roll) on a piece of parchment paper. Spread with a thin layer of jam aside from one strip along a short side. You may not use all the jam. Dollop the whipped earl grey cream overtop of the jam and spread into an even layer.

Use the parchment paper to help you roll up the cake into round log. Roll tightly, but not so tightly such that the filling is squeezed out. Wrap and chill for at least an hour to allow everything a chance to firm up.

When ready to serve, whip the remaining 60g of whipped cream and transfer to a piping bag fitted with a large round tip. Pipe 6-8 dollops of cream on top of the roll cake, depending on how thick you want the slices to be. Top each dollop of cream with a slice of strawberry.

Note on houjicha/cocoa powder: I like to have a greater contrast in colour between the cake and filling so I like to add a tsp of either houjicha or cocoa powder. It makes the cake a light brown tone, which is reminiscent of the colour of tea. It will affect the flavour a bit though, so to avoid any distractions, leave it out!

lemon verbena & rhubarb fraisier (& tentimestea turns 7!)

lemon verbena and rhubarb frasier

Today, somehow, tentimestea turns seven!? Is it time for me and my blog’s seven year itch? (I’m not feeling it yet – but…)

Over these seven years, definitely a number of things of have changed (like the fonts – what a reversal from serif to sans) – and a few other things have stayed the same. For instance, I’ve had the same rather prescient blog tagline since I started my blog: tentimestea is indeed primarily about food, my cautious instinct was correct that there really ended up being no books, and the pretentious writing is right on point. Likewise, I’ve kept the same totally irrelevant about page mostly intact.

In this manner my blog has come to be a mish-mash of nostalgia and sentimentality folded in with the newer fonts and occasionally properly exposed photographs – SEO and proper blog form be darned! Because after working on something for seven years, I suppose you do start to get attached to all the idiosyncrasies and random html widgets that were added into the sidebar which now, years later, I don’t have the heart to delete. It’s legacy! For posterity! or so I tell myself.

And so? One more year? Shall we?

lemon verbena and rhubarb frasier

I’ve been thinking about making a fraisier for a while (i.e. about three years). I’m so glad I finally did – it’s not nearly as scary as I thought it would be! Perhaps my biggest fear was the ring of strawberries along the edge not staying in place, or even worse, not being able to pull off the cake ring at the very end. Neither of those events came to pass as you can see (and on the ring removal side, it just takes a bit of warming up via blow dryer.)

Fraisier is a cake named for it’s fruit (la fraise) usually made of two layers of sponge enclosing cream and strawberries, and then topped with a layer of marzipan. It’s most recognizable for the ring of exposed strawberry halves.

This fraisier is a bit of a riff off of the original. Starting with the cake, I went with joconde, an almond sponge, instead of genoise. It’s one of my favourite base cakes – it’s stronger, moister and has a wonderfully rich taste, and in lieu of the marzipan, it provides a gentle almond flavour. For the filling, I infused the creme diplomat with lemon verbena and thyme for a fresh herbal taste, and packed the centre with tart roasted rhubarb. And as hinted, I skipped the marzipan – I love marzipan, but I do think the more-cream-on-top approach, one which I’ve seen a number of times (like here!) is a lovely balance of flavours.

For the ambitious, Tamal Ray recently shared a frasier recipe in the Guardian with a double strawberry ring, while the blog Freddy’s Harajuku has a full on double-decker frasier.

As for me, I can’t wait to try this again in different flavour variations!

lemon verbena and rhubarb frasier

past tentimestea birthday rhubarb cakes:

lemon verbena and rhubarb frasier

lemon verbena, thyme & rhubarb fraisier

  • Servings: one 6-inch cake
  • Print

Creme diplomat and general assembly features from A Baking Journey, joconde from Mary Berry via BBC, and the finishing step of spreading more creme diplomat on top from Ruth Tam via Instagram.

special equipment: cake ring 6″ in diametre and 3″ tall

joconde

  • 3 egg whites
  • pinch cream of tartar
  • 15g sugar
  • 100g ground almond
  • 100g icing sugar
  • 3 eggs
  • 30g flour
  • 30g butter, melted and cooled

roasted fruit

  • 120g chopped rhubarb (chop into about 1.5cm dice)
  • 80g chopped strawberries (chop into about 1.5cm dice)
  • about 2 tsp sugar (or more to taste)

creme diplomat

  • 320g whole milk
  • 3 large sprigs lemon verbena
  • 3 large sprigs thyme
  • 3 egg yolks
  • 20g granulated sugar
  • 20g cornstarch
  • 1 tbsp butter
  • 1 tsp gelatin, bloomed in 1 tbsp water
  • 180g heavy cream, whipped

assembly

  • 1 tbsp milk
  • 1 tbsp grand marnier (or kirsch)
  • strawberries
  • whipped cream

joconde

Preheat the oven to 425F. Butter two 9-inch cake tins and line the bottom of two 9-inch cake tins with parchment paper. Flour the sides.

Place the 3 egg whites in the bowl of a stand mixer and whip until frothy. Add the cream of tartar and sugar and beat until firm peaks are formed. Transfer to another bowl and set aside.

Place the almond, icing sugar and 3 whole eggs in the stand mixer and beat with the whisk on medium-high speed for 5 minutes or until light and fluffy. Sift the flour overtop and fold in. Fold in the melted butter. Dollop a large scoop of egg whites over top and fold in to lighten. Then add the remaining egg whites and fold until incorporated.

Evenly distribute the batter between the two tins and spread into an even layer.

Bake for around 5-10 minutes or until golden and springy. Let cool, then store, covered, until ready to use.

roasted fruit

Preheat the oven to 375F. Toss the strawberries, rhubarb and sugar together on a baking tray lined with parchment paper. Bake for 20-25 minutes, stirring once at the 10 minute mark, or until the fruit is tender and has released juices. Let cool and chill completely.

creme diplomat

Heat the milk until steaming. Coarsely chop the lemon verbena and thyme, and add to the milk. Cover and let cool, then transfer the milk to the fridge to continue infusing overnight. The next day strain the milk, pressing to extract the milk from the herbs. Weigh the strained milk and top up to reach 320g.

Transfer the milk to a medium-small saucepan. In a bowl, whisk together the egg yolks, sugar and salt. Heat the milk until steaming, then slowly pour into the egg yolks while whisking constantly to temper them. Transfer the mixture back to the saucepan and continue to cook, whisking constantly, until the mixture begins to bubble. Cook for at least 1 minute (whisking vigorously) then immediately remove from the heat. Pass through a sieve into a bowl to remove any lumps and whisk in the butter and bloomed gelatin until both are melted. Cover and set aside to cool to room temperature.

Once cooled, whisk the pastry cream until smooth. Whisk in a dollop of the whipped cream to lighten, then fold in the remainder. Use soon.

assembly

Mix together the milk and grand marnier.

Use the 6″ cake ring to cut a 6″ round from each joconde. Place the cake ring onto a plate (it is convenient to place it on your intended serving plate). Put one circle of joconde down and brush with the milk/grand marnier mixture. Line the ring with halved strawberries, cut side against the ring. I needed about 13 strawberry halves, but it will depend on the size of your strawberries (mine varied from 4-6cm tall; try not to exceed 6 or so cm to ensure that the cake doesn’t get too tall!).

Transfer the creme diplomat to a piping bag fitted with a round tip (I used Wilton 2A, about 1cm in diameter). Pipe the creme between each strawberry and then pipe in a spiral to cover the bottom of the cake. Spoon the roasted fruit into the cavity created by the cream and strawberries, and then pipe more cream overtop to cover it. Spread flat and top with the second circle of joconde. Brush with the grand marnier/milk mixture. Finally, spread a final layer of creme diplomat over top and smooth out with an offset spatula.

Cover with plastic and chill overnight to allow the cream to set. The next day, if the cake is not already on your designed serving platter, move it – you can likely lift it up via the ring, but use a wide flat spatula on the bottom for additional support.. Then run a blowdryer (or even a blowtorch, if you have access to one!) along the outside of the ring for several seconds to slightly melt the cream and loosen the ring. Lift up the ring. I garnished with some piped whipped cream, strawberries, lemon verbena and thyme (as well as a single white begonia – they are edible! – the sole output from our struggling balcony plants).

lemon verbena and rhubarb frasier

roasted strawberry star anise ice cream with black sesame caramel swirl

strawberry, star anise and black sesame caramel ice cream

This ice cream is another quasi-take on PB&J: an ice cream base infused with star anise and roasted strawberry puree, and swirled through with a black sesame caramel.

Roasting fruit and then pureeing it into ice cream base has become one of my favourite ways of incorporating fruit into ice cream (I have another couple recipe drafts using this technique with apricots and cherries!). It’s a technique I borrowed from Stella Park’s cherry ice cream, where roasting reduces down the fruit and makes up a significant portion of the base. Though, unlike the original recipe, I like to put in full puree instead of straining in because that way I don’t need quite as much fruit and there’s no chance of waste!

strawberry, star anise and black sesame caramel ice cream

Some reasons to love roasting fruit for ice cream: Firstly, it reduces the water content of the fruit, preventing the ice cream base from becoming crystalline. Second, it also makes for a thicker ice cream base which better holds air from churning and fluff up more (this is only a concern when you churn your ice cream by hand). Finally, I think the concentrated fruit mixture also helps keep the ice cream a bit softer at freezer temperature – though whether that’s due to the first two reasons or something about fibre content, I’m not sure!

strawberry, star anise and black sesame caramel ice cream

This ice cream has gone through a few renditions to get here. The first time I made this ice cream, I tried to use swirl straight black sesame paste into the ice cream. But I found that frozen black sesame paste has a pretty terrible texture for ice cream swirling – it stiffened immediately upon contact with the ice cream and spotted the ice cream with grey fragments.

It was later when I was photographing an ice cream with a caramel sauce that I noticed the caramel kept a wonderful, soft, swirly texture even when frozen (yay sugar!). So in my second try, I made a caramel to act as a vehicle for the black sesame paste. Diluting the paste in caramel also let me add plenty of swirls while keeping the black sesame flavour from overwhelming the ice cream base. But I found that the ice cream was a bit too rich and cloying as the roasted strawberries had lost their brightness.

So for the third attempt, I reduced the proportion of cream a bit and added plenty of lemon juice to brighten the strawberry puree – while the roasted strawberries do taste different from fresh, the acidity keeps the ice cream a bit brighter, all the better to contrast against the sweet, salty and nutty black caramel. Finally, if you’re no so into the black sesame, I also quite like the roasted strawberry and star anise ice cream base on it’s own, so skip the caramel if prefer!

strawberry, star anise and black sesame caramel ice cream

strawberry star anise ice cream with black sesame caramel swirl

  • Servings: about 2 cups ice cream base
  • Print

You’ll only use about half of the caramel. As it makes a fairly small amount of ice cream, if you want to double the recipe, you only need to double the strawberries and ice cream base (there is sufficient caramel for a double recipe). 

black sesame caramel swirl

  • 55g granulated sugar
  • 2 tbsp water
  • 70g heavy cream, heated until quite warm
  • Two finger pinch worth of kosher salt
  • 18g roasted black sesame paste, or to taste

roasted strawberries

  • 400g chopped strawberries
  • 1 tbsp granulated sugar
  • 1 tbsp lemon juice, or to taste

ice cream base

  • 180g heavy cream
  • 3 whole star anise
  • 120g whole milk
  • 20g granulated sugar
  • 2 egg yolks

black sesame caramel swirl

Place the sugar and water in a small saucepan. Heat over medium high to dissolve the sugar, then allow it to bubble away, swirling the pan occasionally, until the sugar caramelizes. Cook to an amber – lighter if you prefer sweeter, and darker if you prefer a bit of bitterness.

Remove from the heat and pour in the hot cream carefully (it will bubble up) and stir to mix. If lumps of hard caramel form, return to the heat and stir until melted. Stir in the salt.

Transfer the caramel to a bowl and stir in the black sesame paste. Set aside to cool completely.

roasted strawberries

Roast at 350F for about 20-25 minutes or until shrunken/reduced, cooked through and the juices have mostly evaporated (after the evaporative losses, I ended up about 180g worth of roasted strawberries.) Transfer to a container (I like to transfer it directly to the cup that comes with the immersion blender as I’ll be blending it eventually) and let cool. Stir in the fresh lemon juice – the strawberries lose their brightness when roasted, and this helps recover it.

ice cream base

Combine the heavy cream and the star anise. Place in the fridge for 24 hours to cold infuse. The next day, fish out the star anise from the cream and set aside.

Get a double boiler ready – set a small saucepan of simmering water on the stovetop and find a glass bowl that fits on top. Whisk together milk, egg yolks and sugar in the bowl. Add the star anise. Place the bowl over the pot of simmering water and stir constantly with a rubber spatula until the temperature reaches about 165F, or thickens enough to coat the back of a spoon and hold a line drawn in it.

Pass through a sieve to and ensure no fragments of star anise remain. Transfer to a container, add the infused cream, and chill.

Add the chilled ice cream base the roasted strawberries and puree until smooth, either using an immersion blender (most convenient) or a stand blender/food processor. 

Put a pan or a container into the freezer so it will be pre-chilled.

Churn the base in an ice cream maker. Stop while the ice cream base is still fairly soft so you can swirl in the caramel a bit. If the caramel doesn’t drip from a spoon, stir in a bit more cream. Spread half the ice cream into the bottom of the pan and drizzle with some black sesame caramel. Repeat with the remaining ice cream and drizzle with more caramel. You’ll have quite a leftover caramel – save the remainder for serving or other applications.

strawberry rhubarb cheesecake bars

strawberry rhubarb crumble cheesecake bars

An admission: maybe I don’t really like gardening. I do love the idea of it and so I like to pretend it’s a hobby of mine, despite that I’ve been avoiding any gardening work for ages. The realization that perhaps I am not as much of a garden fan as I had thought/wistfully dreamed happened while I was doing some weeding this weekend and was forced to come to face with the fact that I am very floppy and useless from spending all day inside.

Of course maybe I’m just sulking because right now gardening is 90% weeding with minimal harvest. But as for what we are harvesting: that is primarily rhubarb! Not to mention that the rhubarb is pretty simple, self-reliant and hardy (all the better to balance my floppiness and uselessness with).

strawberry rhubarb crumble cheesecake bars

This has been one of my favourite recent rhubarb bakes: thick, creamy cheesecake squares dotted with strawberries and rhubarb and a brown sugar and oat crumble.

These bars were inspired by a recipe from Ed Kimber and my mum’s strawberry rhubarb crumble. It took a few tries to get them to where I wanted them: switching the base and crumble to an adapted version of my mum’s crumble recipe, thickening the layer of cheesecake and adding additional fruit. I did try flavouring one version with rosewater, but that was quickly discarded in favour of going full force with my mum’s crumble flavours: cinnamon in the crumble and just vanilla in the cheesecake.

For another strawberry rhubarb crumble inspired bake, there is also this ice cream. And if you’re feeling hung up on the rosewater, I do love the pairing in these cream puffs!

strawberry rhubarb crumble cheesecake bars

Update notes (Jun 2023):

  1. Due to a number of requests, the recipe was updated Jun 2023 to have volume measurements. I went through and retested the recipe using the volume measurements to make sure it would work, though weight will always be more accurate! In my experience different cups/spoons sets can be a bit different.
  2. I also tested increasing the amount of fruit from 115g each to 150g each as was suggested in a comment. This increased amount of fruit works as well! I also upped the tapioca starch to 1 1/2 tsp. (Volume-wise, 150g was about 1 1/4 cups chopped rhubarb and a generous 1 cup chopped strawberries.)
  3. Baking Blocks also shared an amazing video of the recipe! Check it out on instagram here.

strawberry rhubarb cheesecake bars

  • Servings: 16-25 squares
  • Print

The crumble is based on my mum’s recipe, while the cheesecake filling and overall bar concept/structure is adapted from these raspberry cheesecake bars by The Boy Who Bakes (and is also a recipe from his book, One Tin Bakes!). If you’d like to see a video of this recipe in action, check out this one by Baking Blocks.

base & crumble

  • 112g butter (1 stick), at room temperature
  • 43g brown sugar (1/3 cup, lightly packed)
  • 1/2 tsp cinnamon
  • 1/4 tsp kosher salt
  • 125g whole wheat flour (about 1 cup)
  • 33g rolled oats (1/3 cup)
  • 33g quick oats (1/3 cup)

cheesecake layer

  • 450g block cream cheese, at room temperature (16 oz/2 bricks)
  • 75g granulated sugar (3/8 cup, which can be approximated by 1/4 cup + 2 tbsp OR 1/2 cup – 2 tbsp)
  • 70g greek yoghurt (about 1/3 cup)
  • 20g heavy cream (1 tbsp + 1 tsp)
  • 1 tsp vanilla extract
  • 1 1/2 large eggs (the easiest way to do this is by weight – half an egg is 25g, but if you don’t have a scale, try whisking an egg and measuring out 1 1/2 tbsp for the half egg)
  • 1 1/2 tbsp cornstarch

fruit

  • 115g chopped rhubarb (about 1 cup)
  • 115g chopped strawberries (about 1 cup)
  • 2 tsp granulated sugar
  • 1 tsp tapioca starch

for the base, preheat the oven to 350F. Butter an 8″ square baking tray and line with a parchment sling.

Cream the butter with the brown sugar, cinnamon and salt, then mix in the flour and oats until combined and the mixture holds together in clumps. Reserve 1/3 of the mixture for the top crumble. Take the remaining 2/3 of the mixture (about 220g), break it into clumps, and evenly distribute them into the bottom of the prepared tray. Use your fingers or the bottom of a glass (lightly floured if needed to prevent sticking) to firmly pack it down into an even layer. This makes for a thin layer so if needed, you can add a bit more.

Prick the base all over with a fork and pop in the freezer for 10 minutes to firm and chill. Bake for about 15 minutes or until the bottom crust begins to lightly brown. Set aside to cool slightly.

While the base bakes, begin on the cheesecake layer. In a large bowl, cream the cream cheese until smooth and no lumps remain. Mix in the sugar. Then mix in the yoghurt, cream and vanilla extract. Follow by beating in the eggs. Lastly, sift the cornstarch overtop and mix until combined.

Pour the cheesecake layer over the partially baked crust and spread into an even layer.

Next, prepare the fruit. Stir together the rhubarb, strawberries, sugar and tapioca starch. Spoon evenly overtop of the cheesecake.

Finish with the crumble and bake. Break up the remaining 1/3 of the crumble mixture into small crumbs and scatter overtop of the fruit.

Return the pan to the 350F oven and bake for another 30-35 minutes or so, or until the crumble is browned, and the cheesecake layer is mostly set (it’s okay if the middle still has a bit of a jiggle).

Let cool, then refrigerate for at least four hours or overnight to completely chill and allow the cheesecake to set. Run a knife along the two edges baked directly against the pan to loosen the bars first before removing. Cut into 16 or 25 squares.

rhubarb & ginger eton mess (…or what to do with failed pavlova)

rhubarb ginger eton mess

My biggest piece of advice for low sugar baking is: temper your expectations. Decide what tradeoffs you don’t mind! Roll with the punches! Because in some cases, sugar is pretty important… such as in the case of pavlova. I’ve been trying to inch my way down with the sugar (usually I do 1:1, here I tried a cautious 0.67:1), and more recently wanted to give it a try in individual form.

Low sugar pavlova, as it turns out, does not crisp so well. Hence while you’re in the business of trying to achieve a thin, crisp outer layer, mini pavs can become dry all the way through – cooked to styrofoam stage instead of marshmallow.

Another issue with low sugar pavlova is that it develops a bit of a gumminess. It is semi-remedied if you cook it all the way through to the styrofoam stage… and the softening effect of plenty of cream and fruit juices will help re-soften it again too.

Continue reading “rhubarb & ginger eton mess (…or what to do with failed pavlova)”